Blog

Cleaning Your Garden in Summer (Ultimate Guide)
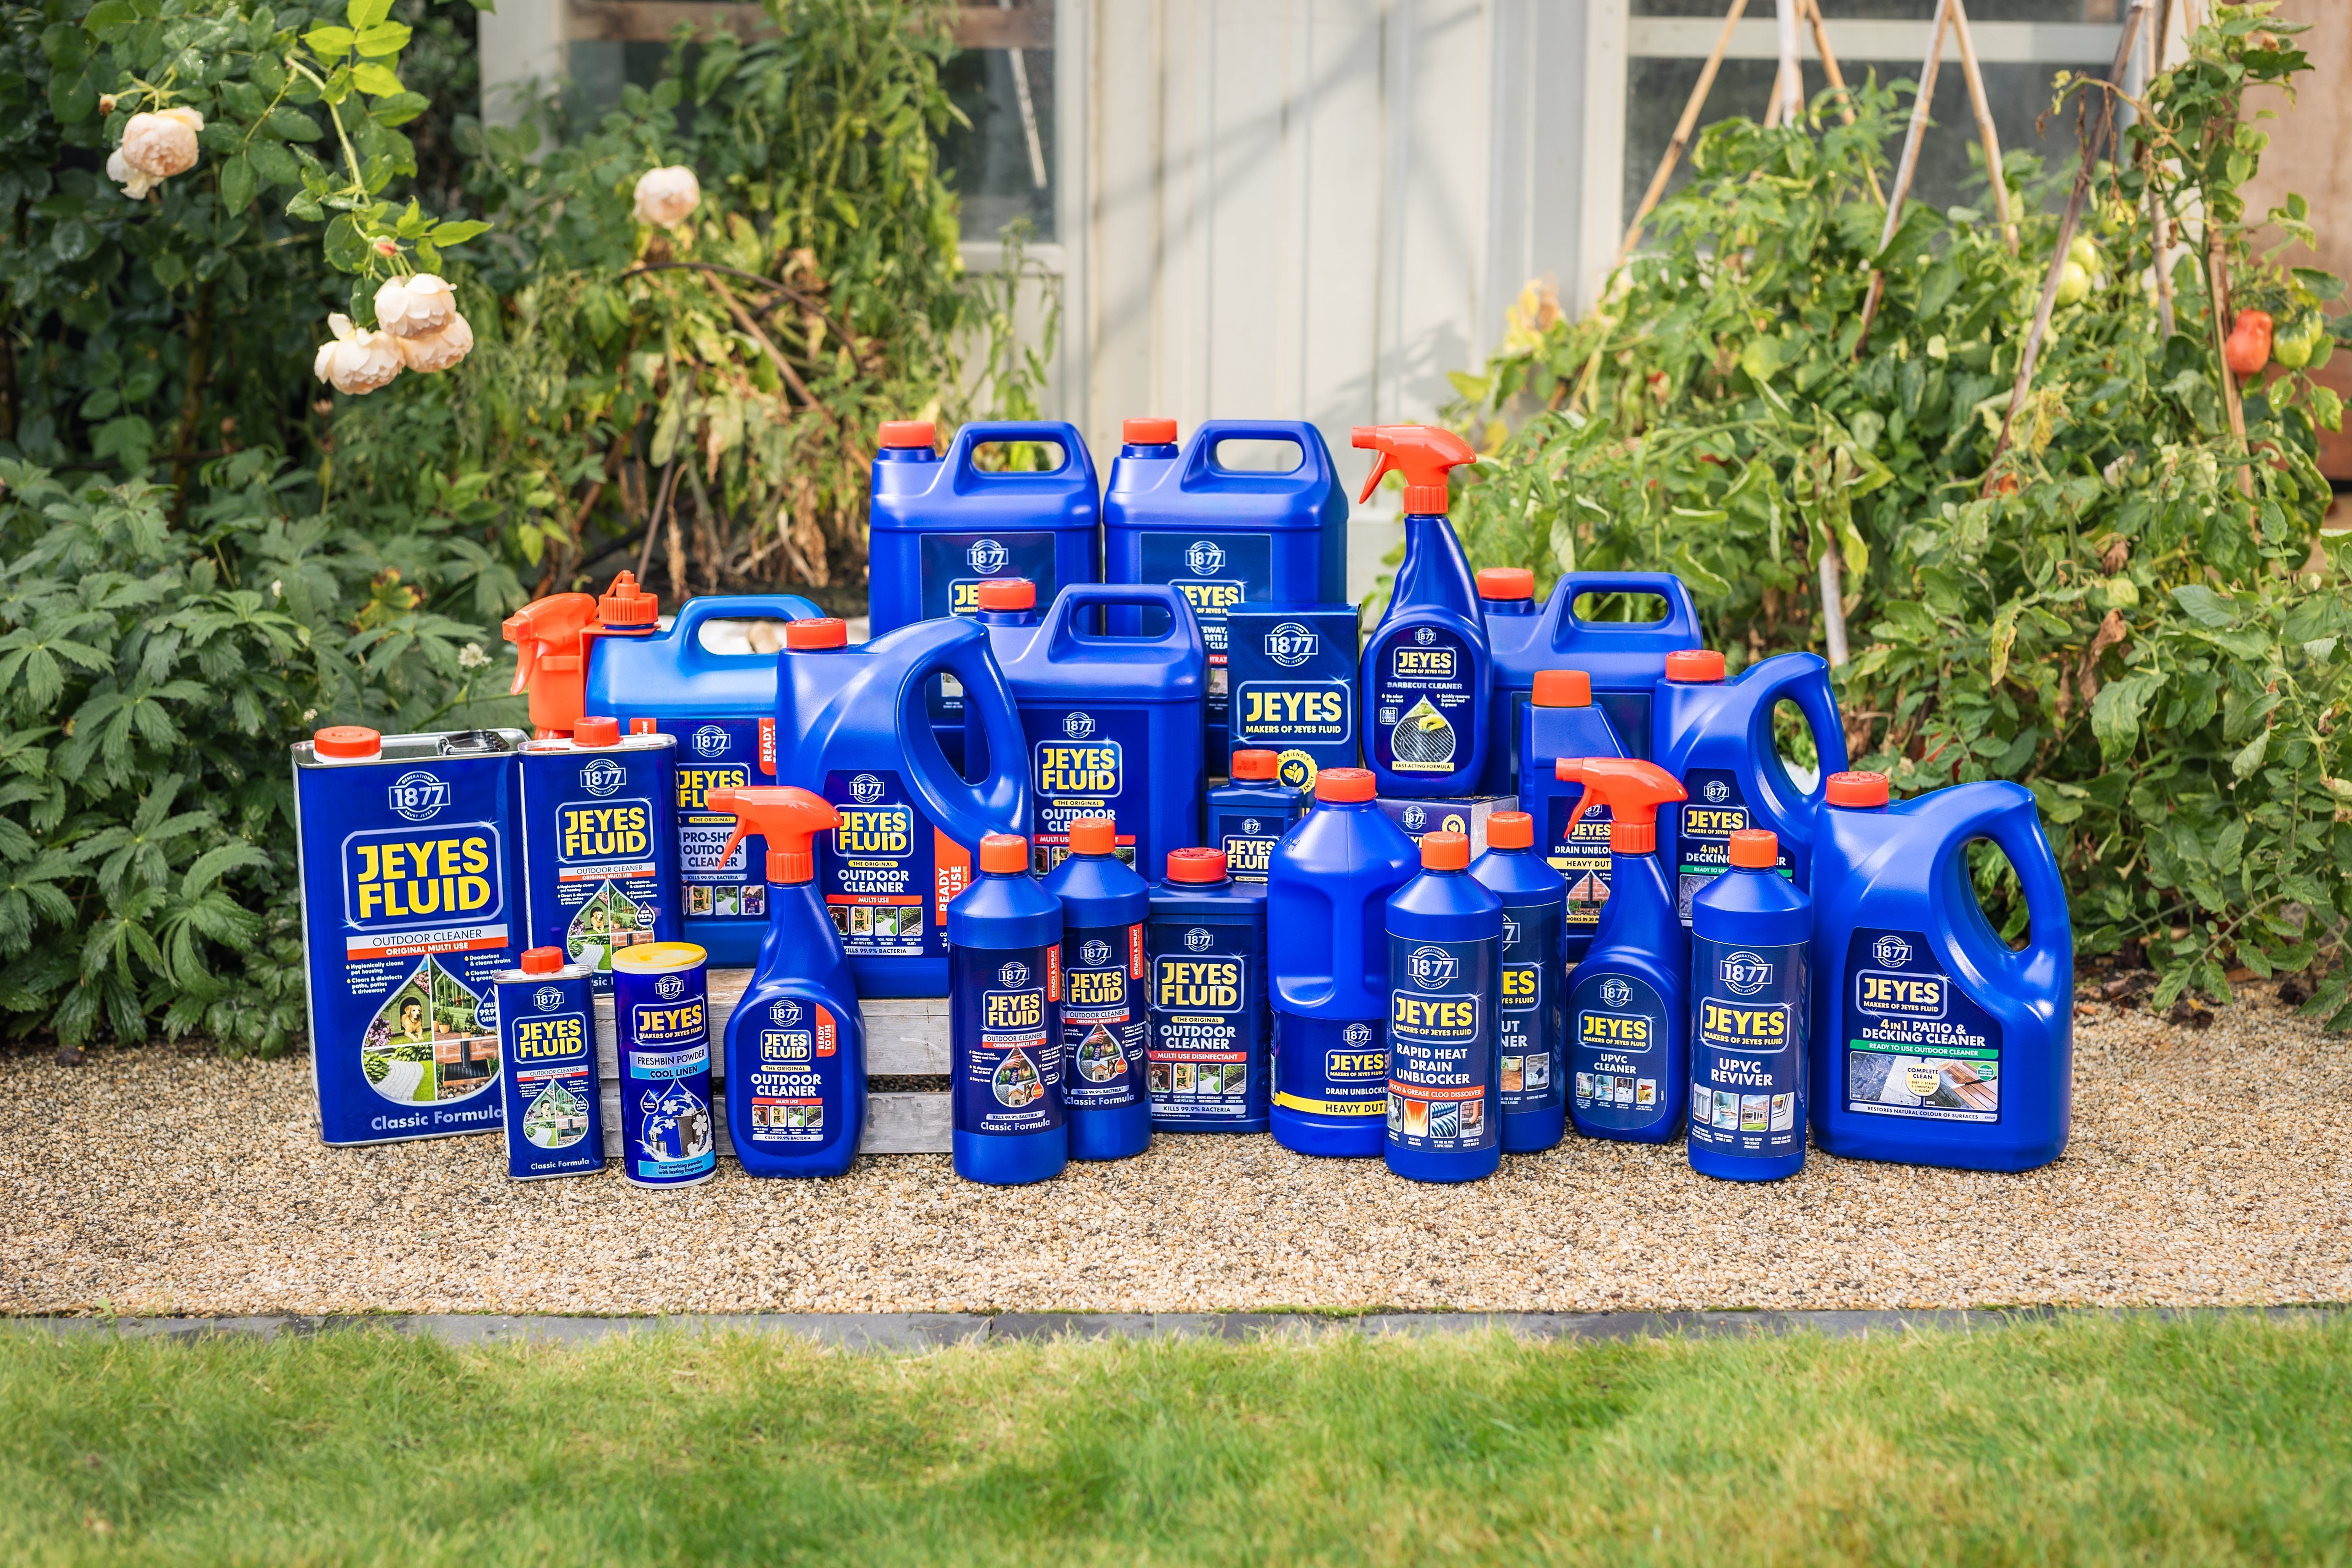
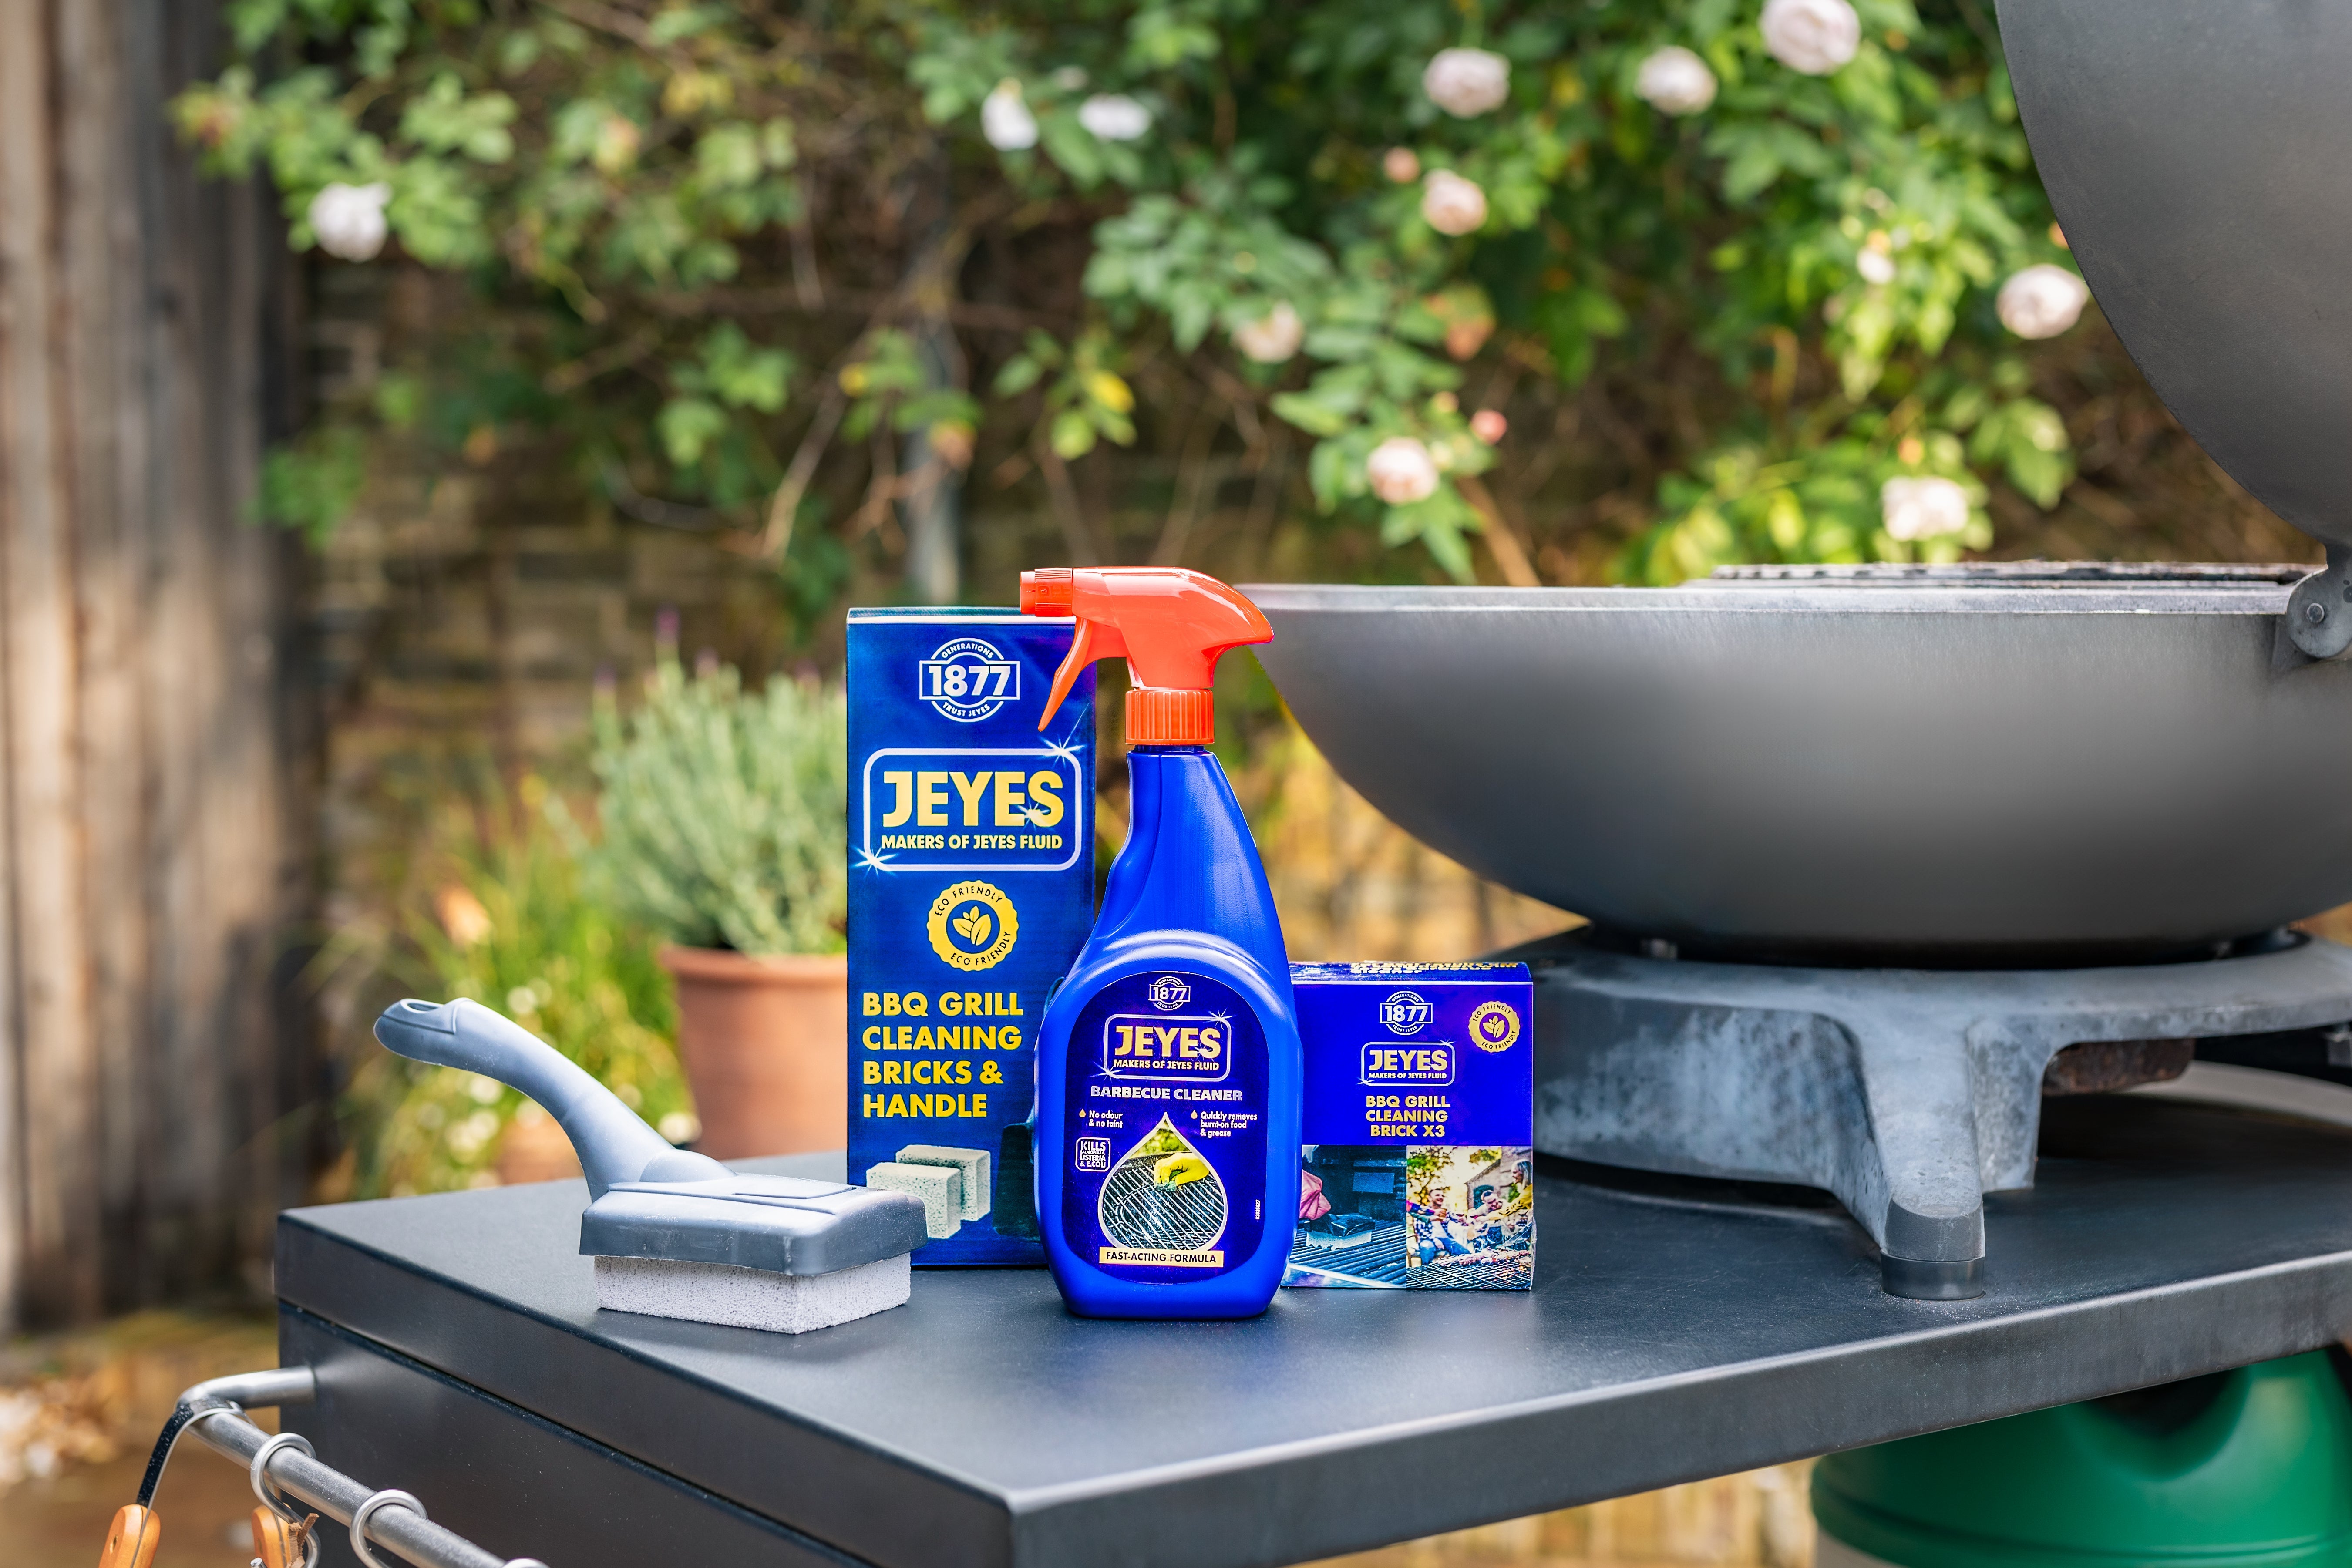
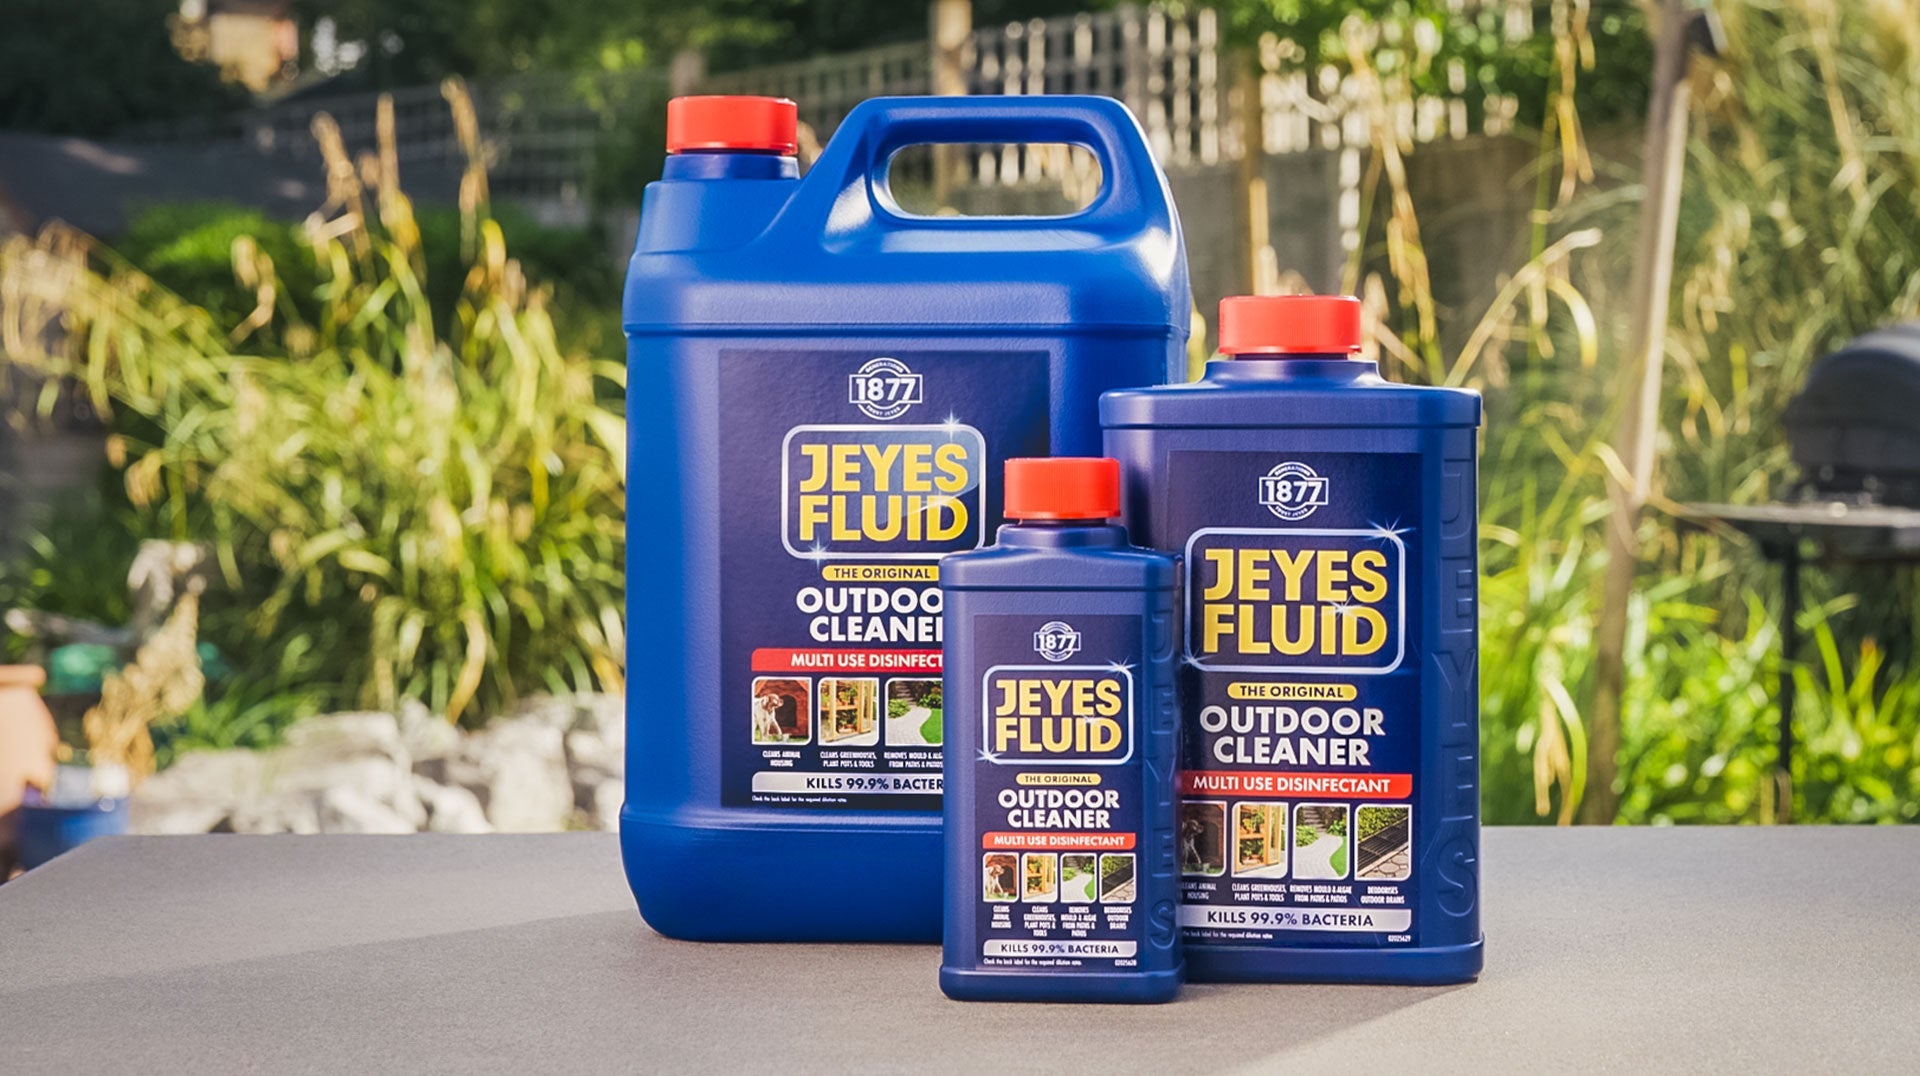
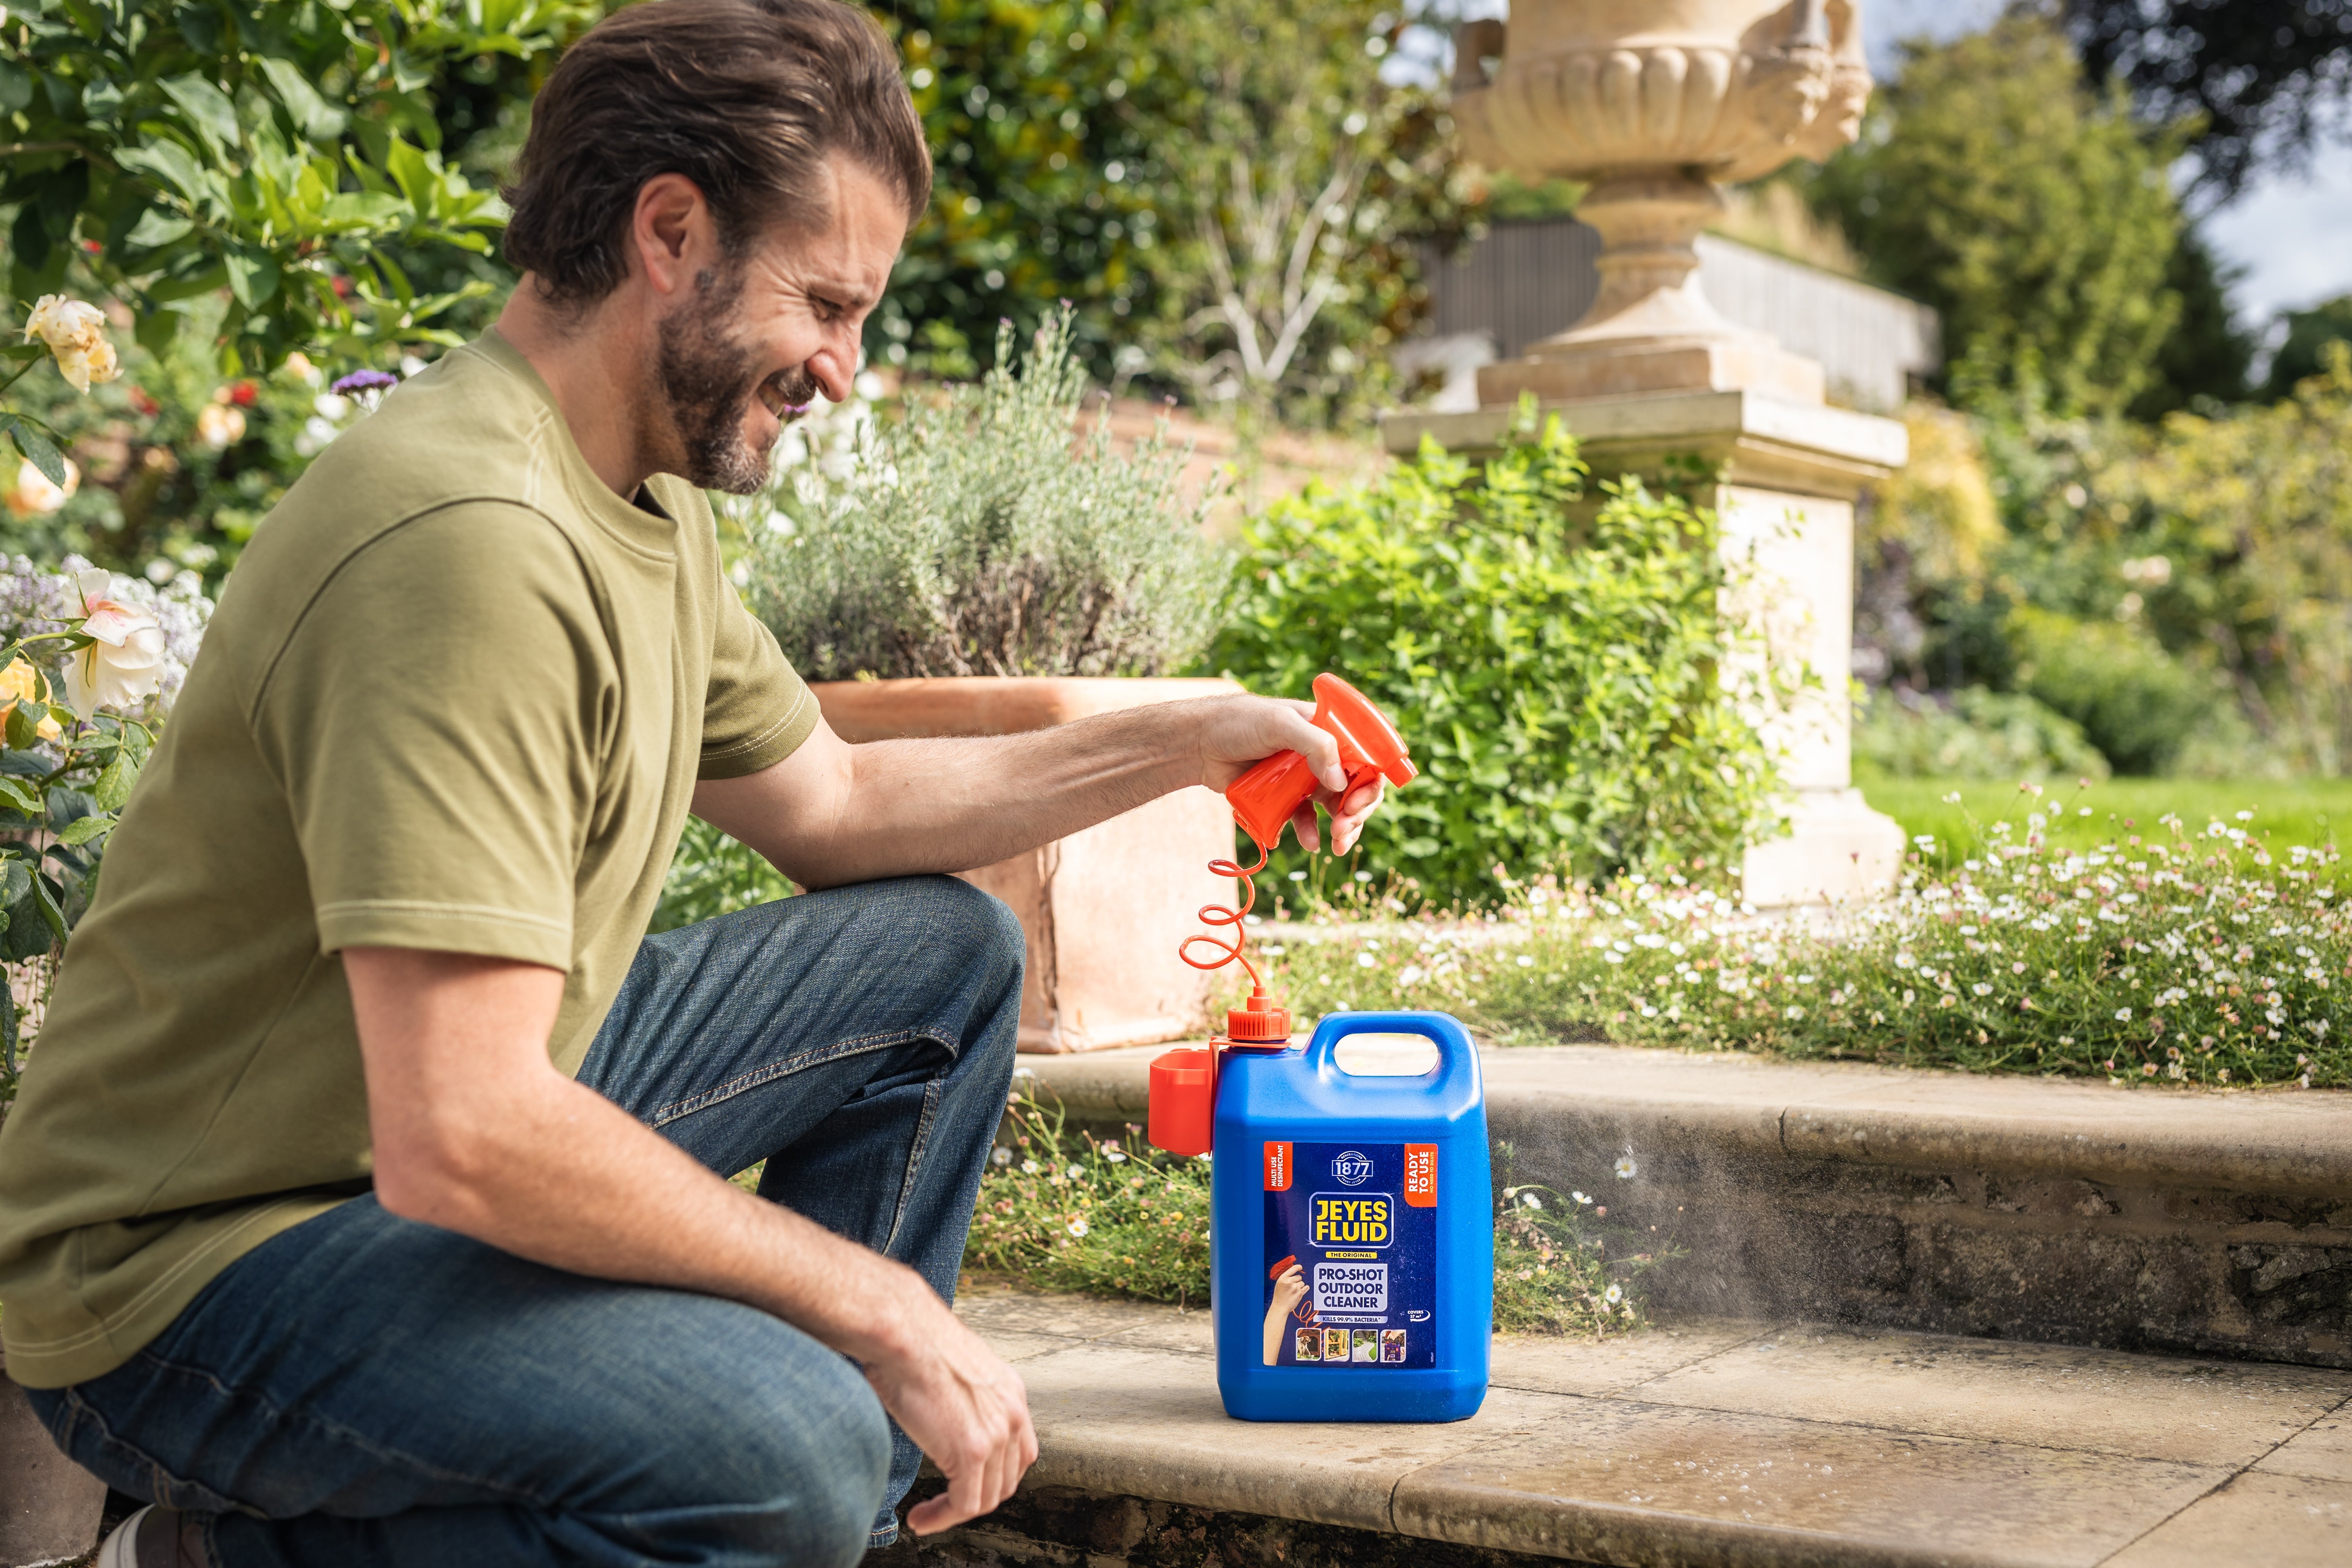
Summer is when gardens are used at their absolute peak. Patios become extensions of the home, children and pets spend more time outdoors and barbecues, gatherings and quiet evenings in the garden become part of everyday life. Yet it is also the season when outdoor spaces can deteriorate fastest if they are not properly maintained. Warm temperatures, increased footfall and intermittent summer rainfall create ideal conditions for algae, mould, bacteria and unpleasant odours to develop across hard surfaces, drains, bin areas and high-use zones. Effective summer garden cleaning is therefore about far more than appearances. As outdoor cleaning specialists since 1877, the team at Jeyes Fluid has seen time and again that summer maintenance is most effective when it is proactive rather than reactive. This ultimate guide brings together practical advice, seasonal insight and proven outdoor cleaning principles to help you care for your garden properly this summer. The Hygiene Risks Summer presents a unique set of hygiene challenges in the garden, largely driven by warmer temperatures, increased moisture and heavier day-to-day use of outdoor spaces. Understanding these risks is essential to maintaining a garden that is not only attractive, but also safe and hygienic throughout the season: Heat, Moisture and Organic Growth Warm weather accelerates the growth of algae, mould and lichen on patios, paths, decking and shaded areas. When combined with summer rain or overnight dew, these organic deposits can quickly spread and become firmly established. Aside from affecting appearance, they significantly increase the risk of slips and falls, particularly on smooth paving or steps that are frequently walked on barefoot. Bacteria and Odours in High-Use Areas Areas that see regular use in summer - such as seating spaces, children’s play zones, bin storage areas and pet areas - are more prone to bacterial build-up. Food residue, organic waste and pet fouling all break down more rapidly in warm conditions, increasing the likelihood of unpleasant odours and hygiene concerns if surfaces are not cleaned thoroughly and regularly. Drains and Hidden Problem Areas Garden drains, gullies and run-off channels are often overlooked until a problem develops. During summer, dry soil, leaves, grass cuttings and organic debris can easily accumulate, restricting water flow. When rainfall does occur, these blockages can lead to standing water and odours, creating conditions that are both unhygienic and difficult to resolve later. Risks for Families and Pets Gardens are heavily used by children and pets during summer, increasing the importance of maintaining clean, safe surfaces. Contaminated paving, stagnant water or poorly maintained waste areas can expose vulnerable users to bacteria that would otherwise be of little concern in cooler months. By recognising how summer conditions intensify hygiene risks outdoors, homeowners can take a more informed and preventative approach to garden cleaning. Addressing these issues early in the season helps reduce long-term damage, supports safer outdoor living and ensures the garden remains a comfortable, enjoyable space throughout the summer months. Preparing Your Garden for a Deep Summer Clean A successful summer clean starts with proper preparation. Taking time to assess your garden, clear problem areas and choose the right approach ensures cleaning is effective, efficient and safe for both surfaces and people. Clear Debris and Organic Waste First Before introducing any cleaning products, remove loose debris such as leaves, grass cuttings, soil and fallen petals from patios, paths, decking and lawn edges. Organic matter left in place can reduce the effectiveness of cleaning solutions and may even encourage further algae or bacterial growth when combined with moisture. Pay particular attention to: Corners and shaded areas where debris collects Around planters, furniture legs and drainage points Bin areas and pet zones where residue can linger Identify Surfaces and Problem Areas Not all garden surfaces should be treated in the same way. Summer cleaning often involves a mix of paving, concrete, stone, decking, artificial grass and masonry - each with different requirements. Taking a few moments to identify surface types helps prevent accidental damage and ensures the correct products and methods are used. This is also the ideal time to pinpoint high-risk areas such as slippery patios, discoloured decking, blocked drains or spaces with persistent odours. Addressing these early prevents them from worsening as temperatures rise. Choose Products Designed for Outdoor Use Outdoor environments require specialist solutions. Household cleaners are not formulated for external conditions and may be ineffective, unsuitable for certain surfaces or require excessive scrubbing to achieve results. If you are unsure which solutions are best suited to your garden, the outdoor product selector can help identify appropriate options based on surface type and cleaning needs. Consider Safety Before You Start Summer cleaning should always be planned with safety in mind. Ensure children and pets are kept away from treated areas during cleaning, follow all label instructions carefully and wear suitable protective clothing where recommended. How to Clean Key Garden Areas in Summer Different parts of the garden face different challenges during summer, from slippery patios to odorous drains and heavily used social spaces. Cleaning effectively means understanding how each area behaves in warm weather and applying the right approach to keep surfaces safe, hygienic and looking their best. Cleaning Patios and Paving Patios and paved areas are among the hardest-working surfaces in summer. Increased foot traffic, food spills, plant debris and warm, damp conditions all contribute to algae and grime build-up. Left untreated, this can create slippery surfaces and stubborn staining that becomes harder to remove as the season progresses. Regular cleaning using a dedicated patio solution helps lift dirt and organic growth without damaging the surface. Products specifically developed for paving, such as those found in the patio and decking cleaner range, are designed to tackle algae and grime while being suitable for repeated seasonal use. For deeper or more established build-up, a concentrated solution like the 4-in-1 Patio & Decking Cleaner can help restore appearance and improve underfoot safety when used as directed. Decking Care in Hot Weather Decking, whether timber or composite, requires particular care during summer. Heat can dry out wood, while moisture encourages algae growth on shaded boards. Using unsuitable products or overly aggressive methods can damage the surface or reduce its lifespan. A gentle but effective approach is key; remove loose debris first, then clean using a decking-appropriate solution, paying attention to grooves and joins where dirt collects. Regular maintenance during summer helps prevent slippery build-up and keeps decking safer for barefoot use. Artificial Grass and Lawn Surrounds Artificial grass and lawn edges often become focal points during summer, especially in gardens with children or pets. While artificial turf is low maintenance, it can still harbour bacteria, odours and residues in warm weather. Occasional treatment with a specialist cleaner, such as artificial grass cleaner, helps maintain hygiene, neutralise odours and keep the surface fresh without affecting the structure of the grass. Garden Drains, Gullies and Run-Off Channels Drains and gullies are frequently overlooked until problems arise. During summer, dry debris such as soil, leaves and grass cuttings can accumulate unnoticed. When rain arrives, blockages can quickly lead to standing water and unpleasant smells. Routine maintenance using solutions from the drain unblocker range helps keep water flowing freely and reduces the risk of odours developing during hot weather. For tougher blockages, a powerful option like Liquid Heat Drain Unblocker can be used as part of a proactive summer maintenance routine. High-Use Pathways and Access Areas Paths, steps and entry points into the garden experience concentrated foot traffic in summer. These areas benefit from more frequent attention, particularly where surfaces transition from indoors to outdoors. Keeping them clean helps prevent dirt being tracked inside and reduces slip risks during sudden summer showers. By tailoring your approach to each key garden area, summer cleaning becomes more manageable, more effective and far more reliable. Addressing problems early not only improves appearance but also supports safer, more hygienic outdoor living throughout the season. Summer Bin Areas, BBQ Zones and Outdoor Living Spaces During summer, certain parts of the garden are exposed to higher hygiene demands than at any other time of year. Bin storage areas, barbecue zones and outdoor seating spaces are used frequently and often in close proximity to food, making regular and effective cleaning particularly important in warm weather. Managing Bin Areas in Hot Weather Wheelie bins and outdoor bin stores are a common source of odours during summer. Heat accelerates the breakdown of food waste and organic material, increasing smells and attracting insects if bins and surrounding areas are not properly maintained. Regularly cleaning bin lids, handles and the ground beneath helps control bacteria and prevents odours from lingering. Using a specialist solution such as Jeyes Fluid Freshbin Powder can help neutralise smells at the source and support a cleaner, more hygienic bin area throughout the warmer months. Keeping BBQ Areas Hygienic and Food-Safe Barbecues are a highlight of summer, but they also present specific hygiene risks if grease, food residue and burnt-on deposits are allowed to build up. Dirty grills can affect food quality and increase the risk of contamination, particularly when cooking for family and guests. Cleaning barbecues regularly during the season helps maintain safe cooking conditions and prolongs the life of equipment. Purpose-designed products from the BBQ cleaning solutions range are formulated to tackle stubborn grease and carbon deposits without unnecessary effort. For routine maintenance, a targeted option like the BBQ Cleaner allows grills, trays and cooking surfaces to be cleaned efficiently before or after use, supporting better hygiene all summer long. Outdoor Seating and Social Spaces Patios, tables, chairs and outdoor furniture are used more frequently in summer and are often exposed to food spills, sunscreen residue, pollen and general grime. These areas benefit from regular light cleaning to maintain comfort and appearance, particularly before guests arrive. Pay attention to armrests, table edges and surrounding paving where residue can build up unnoticed. Maintaining cleanliness in these social spaces helps preserve their appearance and ensures they remain welcoming, hygienic environments for everyday use. By giving bin areas, BBQ zones and outdoor living spaces the attention they require during summer, you reduce odours, support food safety and create a garden environment that is both enjoyable and responsibly maintained throughout the season. Protecting Surfaces After Cleaning Once garden surfaces have been thoroughly cleaned, protecting them is an important next step - particularly in summer. Warm weather encourages rapid regrowth of algae and organic matter and unprotected surfaces can quickly lose the benefits of even the most thorough clean. Why Surface Protection Matters in Summer During summer, cleaned patios, paving and masonry are immediately exposed to sunlight, airborne spores, pollen and moisture from watering or rainfall. Without protection, these elements can begin to take hold again, leading to faster discolouration and renewed slipperiness. Applying protective treatments after cleaning helps to: Slow down algae and grime regrowth Make surfaces easier to maintain between cleans Preserve the appearance of paving and masonry for longer Reduce the need for frequent deep cleaning This preventative approach is particularly valuable during periods of high garden use, when safety and appearance matter most. Protecting Patios, Paving and Grout Porous materials such as stone, concrete and grout are especially vulnerable once they are clean, as open pores readily absorb moisture and organic contaminants. Using products from the surface protection and grout cleaning range helps create a more resilient surface that is better equipped to cope with summer conditions. Protection does not replace regular maintenance, but it significantly reduces how quickly dirt and algae return, making routine cleaning quicker and less labour-intensive. Sealing Driveways and Masonry Areas Driveways, garden paths and masonry features benefit from additional protection after cleaning, particularly in exposed or high-traffic areas. Applying a specialist sealer helps repel water, reduce staining and protect against weathering during warmer months. A product such as Jeyes Masonry & Driveway Sealer can help maintain a cleaner appearance for longer while supporting the long-term condition of outdoor surfaces when used as directed. A Smarter, Long-Term Approach to Garden Care Protecting surfaces after cleaning reflects a considered, expert-led approach to summer garden maintenance. Rather than repeatedly tackling the same problems, surface protection helps extend the life of cleaning results and supports safer, more reliable outdoor spaces throughout the season. Summer Garden Cleaning Safety Advice Cleaning the garden in summer should always be approached with care and consideration. Warmer temperatures, increased outdoor activity and the presence of children and pets mean safety must remain a priority at every stage of the cleaning process. Follow Product Instructions Carefully Always read and follow the instructions provided on outdoor cleaning products. These guidelines are designed to ensure effective results while protecting both users and surfaces. Using more product than recommended or applying it incorrectly does not improve performance and can increase risk. Purpose-designed outdoor solutions are formulated to work efficiently when used as directed, reducing the need for excessive scrubbing or repeat applications. Protect Children and Pets During Cleaning Summer often means children and pets are in the garden more frequently. During cleaning, it is important to keep them away from treated areas until surfaces are fully dry and safe to use again. This is particularly important when cleaning patios, paths and high-use zones where contact is more likely. Where possible, plan cleaning for quieter times of day and allow adequate drying time before the area is used again. Wear Suitable Protective Clothing Depending on the task, basic protective equipment such as gloves and suitable footwear can help reduce the risk of skin contact or slips. Non-slip footwear is especially important when cleaning smooth paving or decking, as surfaces may be wet during the process. Be Mindful of Heat and Ventilation In hot weather, outdoor cleaning should be carried out during cooler parts of the day, such as early morning or late afternoon. This helps reduce fatigue and allows greater control when applying products. Avoid working in direct midday sun where possible and take regular breaks to stay comfortable and focused. Store Products Safely in Warm Weather Cleaning products should always be stored in line with label guidance, away from direct sunlight and out of reach of children and pets. Warm conditions can affect product performance if storage instructions are not followed. By taking a careful, informed approach to safety, summer garden cleaning can be carried out confidently and responsibly, helping to maintain a clean, hygienic outdoor space without unnecessary risk. How Often Should You Clean Your Garden in Summer? One of the most common questions homeowners ask is how frequently garden cleaning should be carried out during summer. The answer depends on weather conditions, usage levels and the types of surfaces in your outdoor space, but a structured routine helps prevent problems from developing in the first place. Weekly Light Maintenance In summer, light maintenance on a weekly basis is often enough to keep gardens looking presentable and hygienic. This includes sweeping patios and paths, removing organic debris, checking bin areas and rinsing down high-use zones such as seating areas and entrances. Regular attention at this level helps prevent algae, dirt and residues from becoming ingrained, particularly during warm spells when build-up happens quickly. Monthly Deeper Cleaning A more thorough clean every few weeks is advisable for surfaces such as patios, decking, artificial grass and drains. This is especially important during periods of high use, such as school holidays or extended dry weather followed by rainfall. Seasonal Adjustments During Heatwaves During prolonged hot weather, gardens may need closer monitoring. Increased watering, more outdoor meals and heavier foot traffic can all accelerate grime and bacterial growth. In these conditions, adjusting your routine slightly - for example, checking drains or bin areas more frequently - helps maintain hygiene and comfort. Maintenance vs Deep Cleaning It is important to distinguish between ongoing maintenance and occasional deep cleaning. Maintenance keeps surfaces under control, while deep cleaning restores areas that have been neglected or heavily affected by organic build-up. A balanced approach combining both is the most effective way to care for a garden throughout summer. If you are unsure how often specific areas should be cleaned or which approach is most suitable, the FAQs and expert guidance section provides additional clarity based on common outdoor cleaning scenarios. By adopting a realistic and informed cleaning schedule, summer garden maintenance becomes far more manageable - helping to keep outdoor spaces safe, hygienic and enjoyable throughout the season. Ready to Clean Your Garden! You are now set to clean your garden in the summer. For those looking to maintain their garden with confidence throughout the season, exploring the full range of Jeyes Fluid outdoor cleaning products can help ensure every area is cared for appropriately, using solutions developed specifically for the realities of outdoor cleaning. If you have any direct questions, please contact our team and we will be happy to help.
Read More
How to Clean a Patio Without Pressure Washer
A clean patio can completely transform an outdoor space, but not everyone owns a pressure washer. The good news is that learning how to clean a patio without a pressure washer is not only possible, but often a safer and more controlled way to care for your patio. Manual patio cleaning is often recommended for older paving, delicate surfaces or areas where high pressure could loosen joints or damage the surface finish. As outdoor cleaning experts since 1877, Jeyes Fluid has helped generations of homeowners keep patios, paths and outdoor areas clean, hygienic and well cared for. In this guide, we’ll walk you through practical, proven methods to clean your patio without using a pressure washer. What You’ll Need to Clean a Patio by Hand Cleaning a patio without a pressure washer doesn’t require specialist equipment, but having the right tools and products will make the job easier, more effective and far less time-consuming. Below is a list of essential tools you should have before starting: A stiff outdoor brush – Essential for loosening dirt, algae and grime from paving slabs and joints A bucket – For mixing and applying your cleaning solution Protective gloves – To keep hands clean and comfortable during scrubbing A watering can or hose – For rinsing the surface once cleaning is complete These simple tools give you far greater control than a pressure washer, allowing you to focus on problem areas without damaging the surface of your patio. Choosing the Right Patio Cleaner While household detergents are sometimes used, they are rarely designed for outdoor conditions and can struggle with stubborn grime, algae and organic growth. For best results, it’s important to use a cleaner formulated specifically for patios and paving. A dedicated patio and decking cleaner is designed to break down outdoor dirt effectively while being suitable for use on common patio materials. Jeyes Fluid offers a range of trusted solutions developed for real-world outdoor cleaning, available within our Patio & Decking Cleaner collection. With the right tools and a purpose-made cleaner to hand, you’re fully prepared to tackle your patio cleaning confidently - without the need for high-pressure equipment. How to Clean a Patio Without a Pressure Washer This step-by-step method is designed to deliver reliable results without risking damage to your patio. Step 1: Clear the Patio Surface Start by removing all furniture, plant pots and decorative items from the patio. Sweep the area thoroughly to get rid of loose dirt, leaves and debris. This initial step is important, as it allows your cleaning solution to work directly on the surface rather than being blocked by surface grime. Pay particular attention to corners and edges, where debris often collects and encourages algae growth. Step 2: Apply Your Patio Cleaner Once the surface is clear, prepare your patio cleaner according to the manufacturer’s instructions. Using the correct dilution ensures effective cleaning while protecting your paving and surrounding plants. Apply the solution evenly across the patio using a watering can, bucket or brush. For best results, work in manageable sections so the cleaner does not dry out too quickly. A specialist product such as Jeyes 4-in-1 Patio & Decking Cleaner is designed to break down outdoor dirt, algae and grime without the need for high-pressure water. Always wear gloves and avoid splashing, especially near lawns or planted areas. Step 3: Scrub the Surface Thoroughly After allowing the cleaner to sit for the recommended time, use a stiff outdoor brush to scrub the patio. Work the brush firmly across the slabs, focusing on joints, textured areas and any spots with visible staining or algae. This manual action is what replaces the force of a pressure washer, allowing you to target problem areas precisely without disturbing pointing or damaging the surface. Step 4: Rinse and Inspect Rinse the patio thoroughly with clean water using a hose or watering can. Ensure all residue is washed away, paying close attention to joints and low points where the solution can collect. Once rinsed, inspect the area. Heavily soiled patios may benefit from a second application in particularly stubborn areas, but regular maintenance cleaning is usually enough to keep paving looking fresh and safe underfoot. By following these steps, you can achieve a clean, well-maintained patio - all without the need for a pressure washer or specialist equipment. Removing Algae, Moss and Stubborn Grime Algae, moss and ingrained grime are some of the most common - and most frustrating - patio problems, particularly in damp or shaded areas. Left untreated, these growths not only make paving look unsightly but can also create slippery surfaces that pose a safety risk. Fortunately, they can be tackled effectively without resorting to a pressure washer. Algae and moss thrive where moisture lingers, such as north-facing patios, areas beneath garden furniture or spots close to fences and walls. While vigorous scrubbing will help, stubborn organic growth often needs a cleaner that is specifically designed to break it down rather than simply spreading it around. Applying a specialist outdoor cleaner allows the solution to penetrate the growth and loosen it from the surface of the paving. This makes manual scrubbing far more effective and reduces the amount of physical effort required. For patios affected by widespread grime or recurring algae, a versatile product such as Jeyes Multi-Use Outdoor Cleaner is well suited to the task, helping to lift dirt and organic matter across paving, paths and surrounding hard surfaces. When dealing with heavier build-up, it’s best to focus on one section at a time. Allow the cleaner to work for the recommended period, then scrub thoroughly, paying particular attention to joints and textured surfaces where growth can anchor itself. Rinse well and reassess before moving on to the next area. Regular attention to algae and moss - rather than waiting until the problem becomes severe - will keep your patio looking cleaner for longer and help maintain a safer, more enjoyable outdoor space, all without the need for high-pressure equipment. How Often Should You Clean Your Patio? As a general rule, a thorough clean once or twice a year is sufficient for most patios - typically in spring to refresh the space after winter and again in autumn to remove summer build-up before colder, wetter months set in. These deeper cleans help prevent dirt and algae from becoming ingrained and harder to remove later on. In between, lighter maintenance makes a noticeable difference. Sweeping your patio every few weeks helps remove debris that traps moisture and encourages algae growth. If you notice green patches beginning to form or areas becoming slippery, addressing them early with a targeted clean is far easier than waiting until the problem spreads. Tips to Keep Your Patio Cleaner for Longer Once your patio is clean, a few simple maintenance habits can make a significant difference to how long it stays that way: Regular Sweeping Makes a Real Difference Sweeping your patio regularly is one of the most effective ways to prevent dirt and organic matter from building up. Leaves, soil and plant debris trap moisture against the surface of paving slabs, creating the ideal conditions for algae and moss to develop. A quick sweep every couple of weeks - particularly during autumn and winter - helps keep surfaces drier and cleaner. Tackle Algae Early Algae is far easier to remove when it first appears. If you notice green patches starting to form, especially in shaded or damp areas, addressing them promptly with a suitable cleaner and light scrubbing will prevent the growth from spreading and becoming slippery. Early intervention saves time and effort compared to dealing with heavy build-up later on. Consider Protecting Your Patio Surface For patios that are particularly prone to staining or organic growth, applying a surface protection product can be a worthwhile long-term solution. Sealers help reduce water absorption, making it harder for dirt, algae and moss to take hold in the first place. Jeyes Fluid offers specialist solutions designed to protect masonry and paving once cleaned, helping to extend the results of your hard work. Products within our Surface Protection & Grout Cleaning range are designed to support long-lasting cleanliness while maintaining the appearance of outdoor surfaces. By combining regular maintenance with early treatment and, where appropriate, surface protection, you can enjoy a cleaner patio for longer - without relying on intensive cleaning methods or pressure washing. Why Choose Jeyes Fluid for Patio Cleaning? When it comes to caring for outdoor surfaces, experience matters. Jeyes Fluid has been helping households maintain clean, hygienic outdoor spaces for generations, with a heritage that stretches back to 1877. Unlike general household cleaners, Jeyes Fluid outdoor solutions are developed with real outdoor conditions in mind; this means you can clean effectively without relying on aggressive methods such as pressure washing, which can damage patio surfaces over time. Trust and reliability sit at the heart of everything we do. Our patio and outdoor cleaning products are created to deliver consistent results while being straightforward to use, allowing homeowners to clean with confidence and control. Clear instructions, dependable performance and a focus on safety ensure you know exactly what to expect every time you clean. You Are Ready! By using simple tools, following a structured method and choosing products designed specifically for outdoor surfaces, you can remove dirt, algae and grime safely and thoroughly. If you want to find the perfect solution to use for your patio cleaning, use our bespoke product selector.
Read More
How to Clean & Disinfect Your Bin
Household bins play a vital role in everyday life, yet they are often one of the least regularly cleaned items around the home. From food waste and packaging to garden debris, bins can quickly become unhygienic if they are not properly maintained. Understanding how to clean your bin thoroughly - not just rinse it - is key to keeping your space cleaner, fresher and more pleasant to use. Drawing on our generations of cleaning expertise, this guide explains exactly how to clean and disinfect your bin properly. What You’ll Need Using appropriate equipment not only improves hygiene results but also helps ensure the task is carried out safely and efficiently.To clean and disinfect your bin properly, you will need: Protective gloves – to prevent direct contact with waste residue and bacteria A stiff brush or long-handled broom – ideal for scrubbing the base, sides and lid Access to water – an outdoor tap or hose makes rinsing far more effective A reliable disinfectant solution – designed to tackle bacteria and neutralise odours Using a trusted bin disinfectant is essential for maintaining proper hygiene. While water alone can remove visible dirt, a disinfectant helps eliminate bacteria that cause lingering smells and hygiene issues. How to Clean Your Bin – Step-by-Step Guide Follow these steps to ensure you are cleaning your bin the most effective way possible: Step 1: Empty the Bin Completely Before you begin, make sure the bin is fully emptied and any liners or loose debris are removed. It’s best to clean your bin shortly after collection day, when it’s at its emptiest and easiest to handle. Step 2: Rinse Away Loose Dirt Using an outdoor tap or hose, rinse the inside of the bin to remove loose waste, residue and surface dirt. Pay particular attention to the base of the bin, where liquids often collect and the inside of the lid. Step 3: Apply Your Cleaning Solution Prepare your cleaning or disinfecting solution according to the product instructions. Apply it evenly across the inside surfaces of the bin, ensuring the sides, base and underside of the lid are all covered. This step is essential for breaking down grime and targeting bacteria. Step 4: Scrub Thoroughly Using a stiff brush or long-handled broom, scrub the bin thoroughly. Focus on corners, seams and any areas where residue tends to build up. Handles and lid edges should not be overlooked, as these are frequent touch points. Step 5: Rinse and Drain Once scrubbed, rinse the bin again with clean, warm water to remove loosened dirt and cleaning solution. Allow the bin to drain fully, either by tipping it slightly or leaving it upside down for a short time. Step 6: Disinfect and Leave to Dry If your cleaning process includes a separate disinfecting stage, apply it now and allow the recommended contact time. Once complete, leave the bin to air dry fully before replacing liners or returning it to its usual position. How Often Should You Clean Your Bin? How often you should clean your bin depends on how it’s used, but as a general rule, a thorough clean and disinfection every two to four weeks is recommended. This helps prevent the gradual build-up of bacteria, residue and odours that can develop even when bin liners are used.If your bin regularly contains food waste, nappies or garden debris, more frequent cleaning may be necessary - particularly during warmer weather, when heat accelerates bacterial growth and smells can worsen more quickly. Households with pets may also benefit from cleaning bins more often to discourage insects and scavenging animals. How to Keep Your Bin Cleaner for Longer Once your bin has been properly cleaned and disinfected, a few simple habits can help keep it hygienic for longer and reduce the need for frequent deep cleans: Use bin liners This is one of the most effective preventative steps. Ensure liners are well-fitted and replaced regularly, especially if they become torn or leak. Wrapping food waste before disposal Ensuring this is carried out can also significantly reduce residue and odours, particularly during warmer months. Rinsing food containers and packaging This helps limit the build-up of sticky residues that encourage bacteria and smells. It’s also good practice to close the bin lid fully after use, as this helps deter flies and prevents rainwater from entering and creating damp conditions inside. Time to Clean! Keeping your bin clean and hygienic doesn’t need to be complicated, but it does benefit from doing things properly and consistently. A consistent routine is far more effective than occasional, reactive cleaning. If you have any further questions about our products, feel free to contact our expert team.
Read More
How to Clean Your Greenhouse (The Right Way)
A clean greenhouse is the foundation of a productive and healthy growing environment. Over time, algae, mould, pests and general garden debris can build up on glass, frames, floors and shelving - all of which can reduce light levels, spread plant diseases and impact the success of your crops. Regular cleaning ensures your plants benefit from maximum sunlight, improved airflow and a more hygienic place to grow throughout the year. At Jeyes Fluid, we’ve been supporting gardeners and homeowners since 1877 with powerful, reliable outdoor cleaning solutions. Whether you’re preparing for the new growing season or refreshing your greenhouse between harvests, the right cleaning routine makes all the difference. Let’s get into the details from our team of experts on how to clean your greenhouse…the correct way. Fail to Prepare, Prepare to Fail! Before you begin washing and disinfecting your greenhouse, it’s important to prepare the space properly. Good preparation ensures you can clean every surface thoroughly, protect your plants from harm and make the cleaning process much more efficient. Here’s what you can do: Remove Plants and Pots Safely Start by taking all plants, pots, seed trays and tools out of the greenhouse. This helps prevent accidental damage and reduces the risk of contaminating healthy plants with dirt or pathogens during cleaning. Move them to a sheltered area outdoors or place them temporarily in your shed or garage while you work. If any pots or trays show signs of disease or mould, keep them separate for disinfecting later. Remove Waste/Debris Greenhouses naturally accumulate leaves, soil, compost and dead plant material. Sweep out all debris from the floor, corners and staging areas, paying close attention to areas where moisture collects. Organic waste left behind can harbour pests, fungi and algae, so removing it at this stage is essential for resetting the environment. If moss or algae is already visible on frames or floors, make a note of these areas so you can treat them more thoroughly during the wash-down. Ventilation is Key Once empty, open doors and windows to improve airflow. Good ventilation helps surfaces dry faster and allows you to work safely when using outdoor cleaning products. Now you are prepped, let’s move on to the cleaning section. Clean and Disinfect Greenhouse Surfaces A thorough clean is essential for removing algae, mould, bacteria and dirt that accumulate on glass, frames, staging and floors. These contaminants not only affect plant health but can also reduce light levels and encourage pests. The right cleaning routine ensures your greenhouse remains bright, fresh and hygienic - ready for the next growing cycle. Wash Down Internal Frames and Glass Begin by washing internal frames, panels and glazing with warm water and a suitable outdoor cleaning solution. Algae and mildew often form in shaded corners or where condensation collects, so pay extra attention to crevices and joins. For a powerful clean that helps disinfect surfaces while breaking down tough outdoor dirt, the Original Classic Outdoor Disinfectant 5L is ideal for tackling large internal areas. If you prefer a versatile cleaner suitable for frames, shelving and general greenhouse surfaces, the Multi-Use Outdoor Cleaner 5L does the trick. Rinse thoroughly with clean water to remove residues and allow surfaces to dry naturally. Deep-Clean Floors and Hard Surfaces Scrub the floor using warm water and an appropriate outdoor cleaner, ensuring the solution reaches edges and corners where build-up is common. A smaller versatile format such as the Multi-Use Outdoor Cleaner 1L is helpful for targeted cleaning or routine touch-ups. For convenience, especially during busy growing periods, the Outdoor Cleaner Ready to Use 4L offers fast application with no dilution required. Once cleaned, allow the floor to dry completely before returning plants and equipment. Disinfect Staging, Shelving and Trays Any surface that comes into contact with pots, seeds or tools should be disinfected to prevent the spread of plant diseases. Wipe down staging, seed trays, potting benches and storage areas, ensuring all surfaces are free from soil and organic matter first. Disinfecting these areas helps prevent fungal spores lingering from previous harvests and supports better plant hygiene throughout the seasons. Clean External Glass and Panels The outside of your greenhouse collects dirt, moss, bird mess and pollution - all of which block valuable sunlight from reaching your plants. Washing external glass improves light penetration and supports stronger plant growth, especially in spring. For fast, wide-coverage cleaning, the Classic Formula Hose-On 1L makes it easy to clean panels, roofs and external frames using your garden hose. This helps lift grime quickly and leaves surfaces brighter and clearer. Address Greenhouse Pests and Diseases A clean greenhouse is one of the most effective ways to prevent pests and diseases from taking hold. Start by monitoring areas where moisture collects, such as corners, shelves and around trays. These damp zones are hotspots for fungal activity, particularly during colder months when condensation is more common. Removing dead leaves and expired plant material is also essential. Organic debris can attract sap-feeding insects and provide shelter for pests to lay eggs unnoticed. After each growing cycle - or whenever you prune or harvest - sweep and dispose of waste to keep your greenhouse clean and tidy. If you’re ever unsure whether an issue is caused by cleanliness, humidity or plant health, our FAQs offer helpful guidance on outdoor cleaning practices and product usage, supporting gardeners with reliable advice rooted in decades of experience. Clean Paths and Surrounding Areas The area around your greenhouse is just as important to maintain as the structure itself. Dirt, algae, moss and mud can build up on paths, paving and adjoining surfaces, creating slip hazards and contributing to moisture problems inside the greenhouse. A clean surrounding space also helps keep pests at bay and prevents debris from being carried into your freshly cleaned interior. Start by brushing away loose leaves, soil and organic matter from the perimeter. These materials hold moisture and can encourage mould or algae to grow near the greenhouse base. Sweeping regularly helps keep the environment dry, tidy and less appealing to slugs, snails and insects. For areas such as paving slabs, decking or concrete pathways, a targeted outdoor cleaner will help remove built-up grime more effectively. The 4-in-1 Patio & Decking Cleaner 2L is ideal for lifting dirt and algae from wooden or composite decking, while the Driveway & Masonry Cleaner 5L provides powerful cleaning for stone, brick and concrete surfaces surrounding your greenhouse. Keeping these areas clean not only improves safety but also prevents dirt from being tracked inside - helping you maintain the fresh, hygienic environment you’ve worked hard to create. Seasonal Greenhouse Cleaning Tips A greenhouse benefits from consistent care throughout the year, but each season presents its own challenges: Spring Spring is the ideal time for the most thorough cleaning. As the main planting season begins, remove any residual dirt from winter, wash down all surfaces and disinfect trays and staging before new seedlings are introduced. Ensuring your glass is clean at this stage maximises light levels, giving young plants the strongest possible start. Summer High temperatures and increased humidity can encourage rapid algae growth, especially on glass and shaded frames. Wipe surfaces regularly and check for mould in corners where moisture may linger. Good ventilation is essential in summer - open windows and vents to prevent condensation while discouraging pests that thrive in warm, stagnant conditions. Autumn As your growing season winds down, autumn is the perfect time to clear away spent plants, sweep out fallen leaves and remove old compost. Organic waste left at this stage can harbour pests or fungal spores over winter. A light end-of-season clean helps maintain hygiene and prepares the greenhouse for colder weather. Winter Cold weather increases the risk of condensation, which can lead to mould. Keep your greenhouse well ventilated on milder days and periodically check walls, floors and shelves for signs of damp. A winter clean-down - even a light one - helps prevent problems from escalating before spring arrives. Let’s Clean Your Greenhouse! You now have all of the foundations to clean your greenhouse! At Jeyes Fluid, we’ve been helping gardeners care for their outdoor spaces for decades. To explore the full selection of powerful outdoor cleaners suited to greenhouses that we offer, visit our Outdoor Cleaner collection. Alternatively, you can use our product selector to pick the one specific for your needs.
Read More
How to Unblock Drains Outside (Expert Guide)
Outdoor drains play a crucial role in managing rainwater, wastewater and everyday runoff around your home - yet they’re often overlooked until something goes wrong. As outdoor cleaning experts trusted by households since 1877, we understand how disruptive a blocked drain can be. From pooling water and unpleasant odours to potential structural concerns, a blockage needs prompt attention and the right approach to clear it safely. In this guide, we explain how to diagnose, clear and prevent outdoor drain blockages using proven methods and dependable solutions. We also outline when to use powerful treatments such as our Liquid Heat Drain Unblocker or our Drain Unblocker depending on the severity and nature of the issue. Signs Your Outdoor Drain Is Blocked First, let’s take a very quick look at any potential signs that your drain is blocked to consider: Slow drainage/standing water Unpleasant odours from drain Gurgling noises or backflow What You Need Before You Begin Before tackling a blocked outdoor drain, it’s important to gather the right tools and protective equipment. This ensures the job can be completed safely, efficiently and without risk to your drainage system. A good unblocking kit typically includes: Protective gloves to safeguard your hands from bacteria and sharp debris. Eye protection, especially when using chemical treatments or drain rods. A drain rod or rod set, ideal for dislodging compacted material deeper within the pipe. A bucket or container for removing standing water or loose debris. A garden hose for rinsing and flow testing once the obstruction has been cleared. Depending on the type and severity of the blockage, you may need a chemical solution to break down grease, fat or stubborn organic matter. This is where choosing the right product makes a difference: For tough, fast-acting results on severe outdoor blockages, many homeowners rely on our Liquid Heat Drain Unblocker. Its powerful formula is designed to cut through heavy build-up rapidly, making it ideal when water flow has significantly slowed or stopped. For regular outdoor maintenance or moderately blocked drains, our Drain Unblocker offers effective, reliable performance with a controlled pour designed for safer, easier application. How to Unblock an Outdoor Drain Outdoor drains can usually be cleared with a systematic approach that removes visible debris, dislodges deeper obstructions and restores full water flow. The steps below follow best practice for safe and effective unblocking, helping you resolve most common issues without unnecessary disruption. Step 1 – Remove Debris from the Drain Entrance Start by lifting the drain cover and clearing away any visible debris such as leaves, mud, moss, food waste or silt. Use gloves to protect your hands, placing the waste into a bucket for easy disposal. Clearing this top layer improves visibility and prevents fresh debris from sliding into the pipe while you work. Step 2 – Flush the Drain with Water Use a garden hose to run water directly into the drain. This helps you assess how restricted the flow is and may push minor blockages further along the pipe. If water backs up quickly or fails to drain at all, it’s likely that a more substantial obstruction lies deeper within the system. Step 3 – Use a Drain Rod to Break Up the Blockage Drain rods are especially effective for dispersing compacted material lodged within the pipe. Attach the rods securely and feed them gently around bends until you meet resistance. Rotate clockwise to break up sludge and accumulated debris - turning anticlockwise can loosen the joints of the rod, so avoid this motion. Continue until you feel the blockage shift and water begins to move freely again. Step 4 – Apply a Suitable Drain Unblocker If rodding alone doesn’t fully resolve the issue or you can still detect slow drainage, applying a chemical unblocker will help dissolve leftover grease, fats, soap scum or organic matter. For deeply stubborn or heavily solidified blockages, our Liquid Heat Drain Unblocker is designed to deliver a powerful, fast-acting solution that cuts through tough build-up with minimal effort. For moderately blocked drains or ongoing maintenance, the Drain Unblocker provides an effective and controlled application, helping to restore water flow while breaking down remaining debris in the pipe. Allow the product to work for the recommended time before flushing with plenty of water. This ensures residues are safely cleared through the system and prevents future clogs from forming. Step 5 – Rinse Thoroughly and Check Flow Once the obstruction has been treated, flush the drain again using a hose until the flow returns to normal. You should see water moving swiftly through the pipe without backing up or pooling near the drain cover. Replace the drain grate securely once the area is clean and functioning properly. How to Prevent Outdoor Drain Blockages in the Future Keeping outdoor drains clear is far easier than resolving a full blockage. With regular maintenance and a few simple preventative measures, you can significantly reduce the likelihood of debris accumulating inside the pipework. Good outdoor hygiene also helps protect surfaces, reduce odours and maintain smooth drainage year-round. Regular Clearing of Debris Fallen leaves, soil, moss and garden waste naturally collect around drain covers, especially during autumn and periods of heavy rain. Clearing this material weekly - or more frequently in challenging weather - prevents large deposits from washing into the drain and forming compacted blockages. Use of Protective Drain Covers Installing a high-quality drain grate or mesh helps stop larger debris from entering the system in the first place. Ensure the cover fits securely and check it regularly for signs of wear or trapped material. A simple visual inspection can prevent costly issues further down the line. Scheduled Outdoor Hygiene Maintenance Routine cleaning of outdoor areas surrounding the drain not only improves appearance but also reduces the amount of dirt, algae and grime capable of washing into the gully. Products such as our Multi-Use Outdoor Cleaner are ideal for maintaining patios, paths and hard surfaces, helping to minimise the build-up of contaminants that contribute to drain issues over time. By integrating these preventative practices into your outdoor care routine, you create a more resilient drainage system and reduce the likelihood of unexpected blockages reoccurring. When to Call a Professional While many outdoor drain blockages can be resolved with careful DIY methods and the right products, there are situations where professional support is the safest and most effective option. If a blockage repeatedly returns despite thorough cleaning, it may indicate a deeper issue such as collapsed pipework, root intrusion or structural damage within the drainage system. These problems require specialist equipment and expertise to diagnose correctly. You should also contact a qualified drainage engineer if you notice foul sewage backing up into an outdoor drain, as this often points to a problem within the foul drainage network rather than a simple gully obstruction. Similarly, if your property is experiencing widespread drainage concerns - such as multiple drains running slowly or overflowing during light rainfall - a professional assessment is strongly advised. Safety must always come first. If at any point the blockage appears beyond the scope of manual tools or chemical treatments or if you’re unsure about the integrity of the system, calling a professional ensures the issue is resolved quickly and securely without risk to your home or outdoor surfaces. For more expert outdoor cleaning solutions, trusted by households since 1877, explore the full Jeyes Fluid range of our outdoor cleaning products.
Read More
Maintaining Your Shed (Expert Guide)
A well-maintained shed is more than just a storage space - it is an essential part of a tidy, organised and functional garden. Regular maintenance also prevents common issues such as damp, mould and unwanted pests, all of which can shorten the lifespan of your shed. At Jeyes Fluid, we have supported homeowners in caring for their outdoor spaces since 1877. In this guide, we’ll walk you through the key steps to maintain your shed effectively - from deep cleaning and exterior upkeep to smart organisation and seasonal care. To find out more about why you can trust us, visit our about us page for a complete overview of our expertise and product range. Start With a Thorough Shed Clean A deep clean is the most effective starting point with shed maintenance. Clearing dirt, washing surfaces and disinfecting problem areas not only improves hygiene but also gives you a clear view of any repairs or issues that may need more immediate attention. Let’s go through the steps to achieve that: Clear Out the Space Begin by removing everything from the shed - tools, pots, equipment, storage boxes and any loose items. Use this moment to declutter, dispose of anything damaged and reorganise items you no longer need. A clear space provides the best foundation for proper maintenance. Clean Floors, Walls and Shelving Once the shed is empty, sweep away loose dirt with a stiff brush and remove cobwebs and debris from floors and surfaces. Next, wash down internal walls, floors and shelving to remove built-up grime, algae and mildew. A high-quality outdoor cleaner makes this step easier and more effective. For reliable and powerful performance, consider using the Original Classic Outdoor Disinfectant 5L to deep-clean and disinfect larger areas. For general cleaning across various surfaces, the Multi-Use Outdoor Cleaner 5L offers a versatile option suitable for routine shed maintenance. Both help ensure a hygienic environment while tackling stubborn outdoor dirt with ease. Disinfect and Remove Odours After washing surfaces, thoroughly disinfect key areas such as corners, floors and shelving where bacteria or mildew can easily develop. This step is essential if you store items like garden waste bins, compost caddies, or damp tools that may encourage unpleasant odours. A disinfected shed maintains better air quality and keeps stored items fresher and more hygienic. If your shed does store any outdoor bins, an odour-neutralising product can help maintain freshness. The Jeyes Freshbin Powder is designed to reduce smells and keep bin interiors clean and hygienic. Clean Windows, Frames and UPVC Areas Finish your internal clean by washing windows, frames and any UPVC features. Dirt, mildew and grime can build up quickly in these areas, reducing natural light and affecting the shed’s appearance. For bright, clean and refreshed surfaces, use the Jeyes UPVC Cleaner 750ml to remove dirt and restore clarity. If your UPVC areas have dulled over time, the Jeyes UPVC Reviver 1L can help bring them back to life with a long-lasting finish. Maintain the Shed Exterior The outside of your shed faces constant exposure, making regular exterior maintenance imperative. Keeping the exterior clean not only improves appearance but also protects the materials from premature wear, helping your shed stay strong and weather-resistant throughout the calendar year. Wash Down Exterior Walls The first step in exterior care is removing any surface dirt, algae, moss or bird mess that has built up. This helps prevent staining and reduces moisture retention, particularly important for wooden sheds. A dependable outdoor cleaner will make it easier to lift stubborn grime and keep surfaces looking fresh. For quick, effective cleaning, you can use the Outdoor Cleaner Ready to Use 4L on exterior walls and doors. If you prefer a convenient hose-on solution for larger areas, the Classic Formula Hose-On 1L provides wide coverage and effortless application. Protect Surrounding Paths and Bases The area immediately around your shed often collects mud, algae and moisture, especially if shaded or surrounded by garden beds. Regularly cleaning nearby paving, decking or masonry helps reduce slip risks and prevents dirt being carried back into the shed.To revitalise these spaces, a targeted cleaner such as the 4-in-1 Patio & Decking Cleaner 2L can break down built-up grime effectively. For stone, brick or concrete bases, the Driveway & Masonry Cleaner 5L offers powerful cleaning performance designed to lift deep-seated dirt from outdoor hard surfaces. Check the Roof and Guttering A shed roof plays a crucial role in protecting the structure from rain and moisture - do not neglect it!Make sure to inspect it regularly for loose felt, cracked shingles or areas where water may be pooling. Clearing leaves, branches and debris from the roof and any surrounding guttering allows water to drain properly and helps prevent leaks. During winter months especially, these checks help reduce the risk of damp forming inside the shed, preserving both the building and what is inside. Prevent Damp, Mould and Pests Damp, mould and pests are three of the most common issues that affect shed longevity. Left untreated, they can damage stored items, weaken structural timber and create an unpleasant environment. Use our prevention tips below to fight these off: Improve Ventilation Solid airflow is one of the best defences against dampness. Ensure your shed has adequate ventilation, either through built-in air vents or by keeping windows slightly open during dry weather. This helps moisture escape, preventing condensation and reducing the likelihood of mould forming on walls or stored items. Remove Debris Keep the shed floor clear and avoid storing wet items inside. If you use your shed to store waste or compost bins, maintaining cleanliness becomes even more important. Regular disinfecting keeps bacteria at bay while preventing smells from developing. Tackle Mould-Prone Areas Early Any areas that feel damp or show dark patches should be cleaned and disinfected promptly. Using the right outdoor cleaning products helps stop mould from spreading and preserves the integrity of the shed’s interior surfaces. Regular checks throughout the year - especially during colder months in the winter - will help you identify issues early before they become harder to manage. Discourage Unwanted Pests Pests and insects thrive in undisturbed, cluttered spaces, particularly where food sources or nesting materials may be present. Keeping the shed organised, clean and free from debris will naturally deter pests. Also, make sure that small gaps are sealed and that doors and windows close properly. This helps keep the space secure without relying on fear-based messaging or harsh pest-control methods. For personalised guidance on choosing the right outdoor cleaning products for your shed and surrounding areas, our custom product selector can help you find solutions bespoke for your needs. Seasonal Shed Maintenance Tips Your shed experiences different challenges throughout the year; adapting your maintenance routine season by season helps protect the structure, keep stored items in good condition and ensure your shed remains a practical, reliable part of your garden. Let’s talk about the different seasons and the types of maintenance you should be targeting in these periods: Spring Spring is the ideal time for a full shed refresh. Begin with a deep clean inside and out, ensuring surfaces are washed, disinfected and free from winter residue. Check for any damage caused by cold weather - such as cracked wood, loose roofing felt, or worn paintwork - and make necessary repairs before the warmer months begin. Improving ventilation at this stage also helps prepare your shed for humid summer air. Summer During summer, sheds can get particularly warm, especially those made of timber or positioned in full sun. Keep windows open when possible to encourage airflow and prevent excess heat from affecting stored tools or compost. Regularly check for signs of insects or rodents, as warm, undisturbed environments can be appealing to pests. Maintaining tidiness and keeping organic materials away from corners will help discourage them naturally. Autumn Falling leaves and wetter weather make autumn a key time for preventative shed care. Clear leaves from the roof and surrounding ground to stop moisture collecting and reduce the risk of rot. Inspect the exterior for any signs of algae or mildew and wash down surfaces before winter sets in. Tidying and reorganising your shed now will make it easier to navigate during colder months. Winter Cold temperatures and prolonged moisture are the biggest threats to sheds in winter. Check for any gaps or weaknesses in the structure and make sure the roof is secure. Avoid storing damp tools inside and periodically inspect interior surfaces for signs of condensation. Regular light cleaning will help prevent mould from forming during extended periods of wet weather. You’re Ready to Maintain Your Shed! You are now fully equipped to maintain your shed all year round. At Jeyes Fluid, we have been helping households care for their gardens and outdoor structures since 1877. Our trusted variety of powerful outdoor cleaning solutions makes it easier to keep your shed fresh, hygienic and well maintained throughout the year. For more inspiration and powerful outdoor cleaners designed for every surface, you can explore our Outdoor Cleaner Collection, or feel free to get in touch and speak to one of our experts.
Read More
Cleaning Your Garden in Spring (Ultimate Guide)
After a long winter, your garden deserves a fresh start. Spring is the perfect time to clear away the effects of cold, wet weather and prepare your outdoor spaces for the months ahead. From moss-covered patios and weather-worn furniture to drains and decking that have seen better days, a thorough spring garden cleaning routine brings everything back to life - restoring brightness, hygiene and pride to your home exterior.At Jeyes Fluid, we’ve been helping households across Britain clean and protect their outdoor spaces since 1877. With over 145 years of expertise, our outdoor cleaning products are trusted to remove stubborn dirt, tackle bacteria and refresh every corner of the garden - safely and effectively.In this guide, we’ll take you through everything you need to know to clean your garden this spring, from the essential tasks and tools to step-by-step methods for patios, decking, furniture and more. Why Spring is the Best Time to Clean Your Garden After months of cold, wet and often harsh weather, winter can leave your outdoor spaces looking dull and neglected. Dirt, moss, algae and general debris tend to build up on patios, decking, furniture and garden paths - not only affecting their appearance but also creating slippery or unhygienic surfaces. Spring is the ideal season to put things right and start afresh.Warmer, drier days make it easier for surfaces to dry after cleaning, while plants and lawns are just beginning to grow again - meaning your garden will quickly return to its vibrant best once cleared and refreshed.A spring garden cleaning routine sets the stage for a summer of outdoor living, giving you clean, safe and welcoming spaces to enjoy. Regular cleaning also helps to protect your outdoor surfaces for the long term. Removing algae and grime from paving slabs or decking prevents permanent staining, while clearing drains and bins stops unpleasant odours before they develop.Our trusted range of products ensures that your garden is not only spotless but also hygienically clean - ready for every barbecue, garden party, or quiet evening outdoors that the season brings.To learn more about our heritage and long-standing commitment to outdoor hygiene, visit our About Us page. Essential Spring Garden Cleaning Checklist A good spring garden cleaning routine covers every area that’s been affected by winter weather - from paving and decking to drains, bins and furniture. Working through each space methodically ensures your garden looks fresh, tidy and ready to enjoy as the warmer months arrive.Here’s your complete checklist for a cleaner, healthier outdoor space this spring: 1. Patios and Paving Slabs Winter rain and frost can leave paving stained and slippery with algae and grime. Start by sweeping away loose debris, then clean thoroughly with Jeyes 4-in-1 Patio & Decking Cleaner 2L. This versatile cleaner removes dirt, disinfects, eliminates algae and revives the natural colour of stone or concrete - restoring your patio’s appearance with minimal effort. 2. Decking and Fencing Wooden decking and fencing are particularly prone to mildew and green growth during damp months. Scrub affected areas with a stiff brush and apply a diluted outdoor cleaner like Jeyes Multi-Use Outdoor Cleaner 5L. It cleans effectively while being gentle on treated timber and outdoor coatings. 3. Garden Furniture Whether it’s plastic, wood, or metal, outdoor furniture benefits from a thorough spring clean. Wipe down with warm water and a mild solution of Jeyes Ready-to-Use Spray to remove dirt, mould and bacteria. For more extensive cleaning, the Multi-Use Outdoor Cleaner provides a powerful yet safe deep clean. 4. Wheelie Bins and Outdoor Waste Areas Bins can harbour bacteria and odours after the colder months. Disinfect and deodorise them using Jeyes Freshbin Powder 550g - a fast-acting, fresh-smelling formula that kills germs and neutralises unpleasant smells, keeping your bin area hygienic. 5. Drains, Gullies and Gutters Blocked drains and gullies can cause standing water or foul odours as temperatures rise. Use Jeyes Drain Unblocker 1L to break down grease, grime and blockages quickly, restoring proper flow and preventing future issues. 6. Greenhouses, Sheds and Outdoor Storage Wipe down windows, shelving and surfaces with a diluted Jeyes Outdoor Cleaner solution. This not only removes dirt and algae but also eliminates bacteria, helping to protect plants, tools and equipment from mould or mildew. By working through this simple checklist, you’ll transform your garden from winter-worn to spring-ready - clean, fresh and full of life. For more ways to revitalise outdoor surfaces, explore our Outdoor Cleaners Collection and Drain Unblocker Range. Step-by-Step: How to Refresh Your Garden After Winter Once you’ve gathered your cleaning products and tools, it’s time to bring your garden back to life. This simple, structured process will help you transform dull, weathered outdoor spaces into a bright, welcoming environment ready for spring. Step 1 – Tidy and Clear Debris Begin by removing any leaves, twigs and other debris that have collected over winter. Sweep patios, paths and decking with a stiff outdoor broom and clear any fallen branches or garden waste from borders and beds. This makes cleaning easier and ensures outdoor surfaces are fully exposed before applying any cleaning solution. Dispose of waste responsibly - composting organic matter where possible to reduce environmental impact. Step 2 – Clean Patios, Paths and Decking Patios, paving slabs and decking tend to show the most visible signs of winter wear. Dilute Jeyes 4-in-1 Patio & Decking Cleaner 4L according to label instructions and apply evenly using a watering can or sprayer. Allow the solution to work for several minutes to loosen dirt and algae, then scrub with a stiff brush. For heavier build-up or stubborn staining, repeat the process or use Jeyes Driveway & Masonry Cleaner 5L for tougher stone and concrete surfaces. Rinse thoroughly with a garden hose to reveal a clean, refreshed finish. Step 3 – Wash and Disinfect Outdoor Furniture Garden furniture can collect mould, dirt and bacteria during the colder months. Clean with Jeyes Multi-Use Outdoor Cleaner 5L, a versatile solution that’s suitable for plastic, metal and painted wood. For quick touch-ups, Jeyes Ready-to-Use Spray offers convenient cleaning for smaller areas or delicate surfaces. Allow furniture to dry completely before placing cushions or covers back on. Step 4 – Clean Bins, Sheds and Drains Tackle odours and hidden bacteria in outdoor bins with Jeyes Freshbin Powder 550g. Sprinkle directly into the base of the bin to absorb moisture and neutralise unpleasant smells. Check drains and gullies for winter debris. If slow-draining or blocked, pour Jeyes Drain Unblocker 1L into the affected area to break down blockages and restore flow. Step 5 – Finishing Touches Once cleaning is complete, give paths and patios a final rinse to remove residue, then sweep away standing water. Clean garden ornaments, wipe shed doors and prepare pots or planters for new spring growth. Taking the time to refresh every corner of your garden now ensures a clean, welcoming space you can enjoy all season long. Safety and Environmental Tips for Spring Cleaning At Jeyes Fluid, safety and environmental responsibility are at the heart of everything we do. Our products are designed to deliver professional cleaning performance while ensuring safe, responsible use around your home and garden. Follow these essential tips to get the best results from your spring garden cleaning while protecting yourself and the environment. 1. Always Read and Follow the Label Before using any outdoor cleaner or disinfectant, take a moment to read the product label carefully. It includes important guidance on dilution ratios, contact times and safe handling. Following these instructions ensures you achieve effective cleaning without overusing the product. 2. Wear Protective Gear Outdoor cleaners are formulated for power and performance. Protect your hands and eyes by wearing gloves and safety glasses, especially when working on large areas or when applying diluted solutions with a sprayer or watering can. 3. Avoid Runoff into Soil or Water When rinsing patios or driveways, try to prevent run-off from entering flowerbeds, lawns, or ponds. Rinse toward paved or gravel areas instead, where the solution can safely disperse. This helps protect plants and wildlife while maintaining cleaning effectiveness. 4. Use Correct Dilution and Contact Times Using more product than necessary won’t improve cleaning results - in fact, it can make rinsing more difficult. Follow the recommended dilution instructions on Jeyes Fluid labels to ensure the perfect balance between cleaning power and safety. 5. Store Safely After Use Always reseal containers tightly and store products upright, away from direct sunlight and out of reach of children or pets. Safe storage helps maintain product quality and ensures long-term reliability. 6. Dispose of Waste Responsibly Never pour leftover cleaner into drains or natural water sources. Instead, follow disposal advice on the packaging and rinse empty containers thoroughly before recycling where facilities exist. With careful use, Jeyes Fluid products help you clean effectively and responsibly - delivering professional results while supporting safer, more sustainable outdoor living. For more product safety information and usage advice, visit our FAQs. Trust Jeyes Fluid for Your Spring Garden Cleaning When it comes to keeping outdoor spaces clean, safe and inviting, few names carry the same heritage and trust as Jeyes Fluid. Since 1877, we’ve been helping UK households care for their gardens, patios and driveways with cleaning products that deliver powerful results you can depend on year after year. Our reputation has been built on more than a century of outdoor cleaning expertise. Every Jeyes Fluid product is specially formulated to remove dirt, kill bacteria and tackle even the toughest outdoor grime - all while being safe to use when diluted correctly. Spring Garden Cleaning Ready! A thorough spring garden cleaning is the best way to welcome the warmer months and bring new life to your outdoor spaces. By clearing away winter’s dirt, washing key areas and using trusted cleaning solutions, you’ll not only create a beautiful garden to enjoy but also protect your surfaces for the seasons ahead. Explore the full Jeyes Fluid Outdoor Cleaning Range to find everything you need for a cleaner, fresher and more welcoming garden this season.
Read More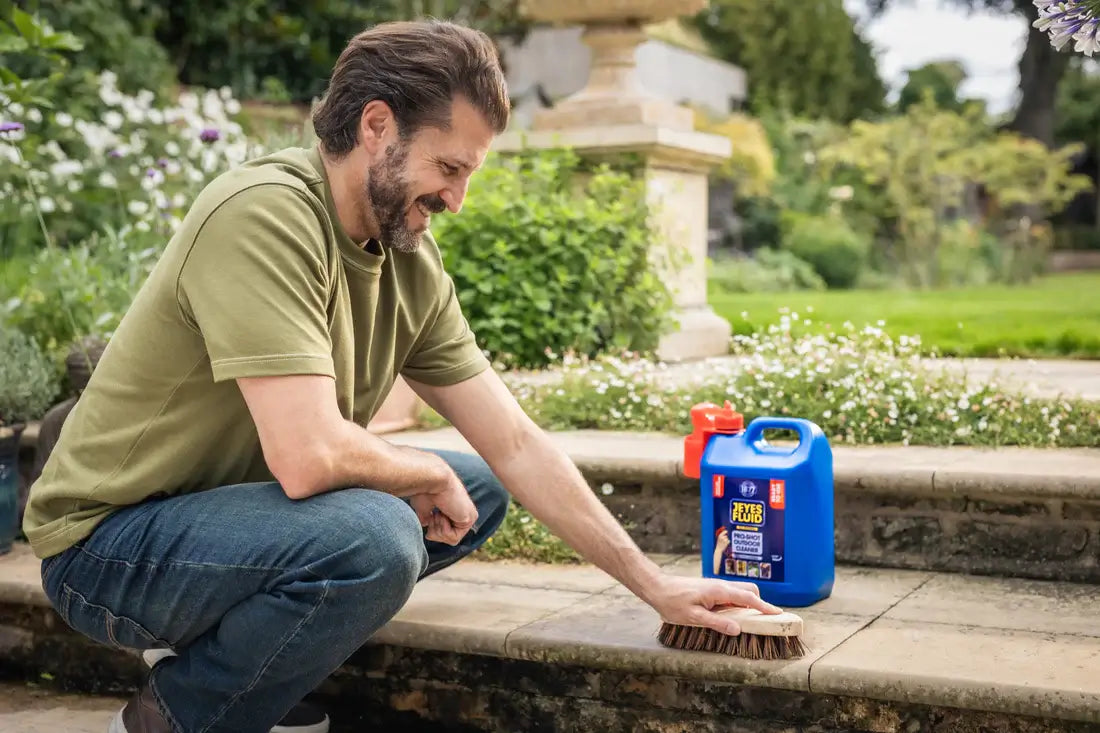
How to Clean Paving Slabs (Step-By-Step Guide)
Keeping your paving slabs clean is one of the simplest ways to restore the beauty of your outdoor spaces and protect them from long-term wear. Over time, natural growths like moss and algae can dull the appearance of patios, driveways and garden paths, making them slippery underfoot and unsightly to look at. Knowing how to clean paving slabs properly ensures your surfaces not only look their best, but also remain safe, hygienic and well maintained throughout the year.At Jeyes Fluid, we’ve been helping homeowners care for their outdoor spaces since 1877. With over 145 years of expertise in outdoor hygiene, we understand what it takes to remove stubborn grime and restore paving to a like-new finish. In this step-by-step guide, our cleaning experts share the safest and most effective methods for tackling everyday dirt, seasonal build-up and deep-rooted stains - using trusted Jeyes Fluid outdoor cleaning solutions that deliver powerful results with every application. Why Cleaning Your Paving Slabs Matters Paving slabs are constantly exposed to the elements - from rainfall and frost to fallen leaves, mud and garden debris. Over time, this exposure allows dirt, moss and algae to build up across the surface. Not only does this make your patio or driveway look tired and discoloured, but it can also create a slippery layer that poses a safety risk, particularly during wet or cold weather.Regular cleaning is about much more than just keeping things looking tidy. It helps protect the integrity of your paving, preventing organic matter and grime from settling into the stone or concrete where it can cause staining and deterioration. Left untreated, this build-up can also encourage weeds to take root between slabs, making maintenance harder in the long run.By taking the time to clean your paving slabs properly, you’ll not only improve the appearance of your outdoor space, but also extend the life of your surfaces.Our heritage and expertise make us the brand homeowners continue to trust for powerful, reliable results that stand the test of time. For more on our history and heritage, visit our About Us page. Tools and Materials You’ll Need Before you begin cleaning your paving slabs, it’s worth gathering everything you’ll need to complete the job safely and efficiently. Having the right tools and products on hand will help you achieve a deeper, longer-lasting clean without damaging your surfaces. Essential Equipment Stiff outdoor brush or broom – for loosening dirt, moss and debris. Bucket or watering can – for mixing and applying cleaning solutions. Garden hose – to rinse surfaces thoroughly. Protective gloves and eyewear – to ensure safe handling of cleaning products. Scraper or edging tool – for removing weeds or moss between slabs. Recommended Jeyes Fluid Products To ensure a deep, hygienic clean that eliminates grime, algae and unpleasant odours, we recommend using one of the following trusted outdoor cleaning solutions: Jeyes Fluid Original Outdoor Disinfectant 5L – a powerful, multi-purpose disinfectant ideal for paths, patios and driveways. Jeyes 4-in-1 Patio & Decking Cleaner 2L – formulated to clean, disinfect, remove algae and revive outdoor surfaces with ease. Jeyes Driveway & Masonry Cleaner 5L – designed for tackling tough dirt and oil stains on stone, concrete and brickwork. All of these products are part of our specialist Patio & Decking Cleaners Collection, developed to deliver professional cleaning results for a wide range of outdoor surfaces.With your tools and cleaning solution ready, you’re now prepared to start the process. How to Clean Paving Slabs – Step by Step Cleaning paving slabs properly doesn’t need to be difficult - it just requires the right approach and a trusted cleaner. Follow these steps for safe, effective results that restore your outdoor surfaces to their best condition. Step 1 – Clear and Prepare the Area Begin by removing any furniture, plant pots, or garden accessories from your patio or path. Sweep away loose dirt, leaves and debris using a stiff outdoor brush. Clearing the surface first will make cleaning more effective and prevent dirt from spreading as you wash.If you notice weeds or moss growing between the slabs, use a scraper or edging tool to lift them out before applying your cleaner. This ensures the solution can penetrate deeply into the paving surface for a more thorough clean. Step 2 – Apply Your Chosen Cleaner Next, prepare your cleaning solution according to the product instructions. For general disinfection and algae removal, Jeyes Fluid Original Outdoor Disinfectant 5L can be diluted and applied evenly over the surface using a watering can or garden sprayer.For heavier build-up or stubborn grime, Jeyes 4-in-1 Patio & Decking Cleaner 4L offers powerful four-in-one action - cleaning, disinfecting, removing algae and reviving the natural colour of your slabs.Apply the cleaner generously across the entire area and leave it to work for the time stated on the label. This contact time allows the active ingredients to break down dirt and organic growth for easier removal. Step 3 – Scrub and Rinse Thoroughly Once the solution has had time to act, scrub the paving with a stiff brush or broom to lift away loosened grime and stains. Work in small sections to ensure even cleaning, focusing extra attention on any areas with visible discolouration.Rinse thoroughly using a garden hose to wash away all residue. This is important for preventing streaks and ensuring the surface is safe for use once dry. Avoid rinsing large amounts of cleaning solution into drains or lawns - instead, direct rinse water into gravel or paved areas where possible. Step 4 – Treat Stubborn Stains and Algae For patches of black spot, lichen, or heavy algae growth, a repeat treatment may be needed. Apply a second coat of cleaner to the affected areas, scrub again and rinse well. The Jeyes Driveway & Masonry Cleaner 5L is particularly effective here, cutting through tough deposits and restoring the natural finish of stone and concrete.For ongoing prevention, consider applying your chosen cleaner periodically through the year to stop algae returning and to maintain a fresh, clean appearance. Step 5 – Allow to Dry and Inspect Finally, allow the surface to dry completely before replacing furniture or plant pots. Once dry, check the paving for any missed spots and touch up if necessary. Regular maintenance - a quick sweep or rinse every few weeks - will help keep your paving in excellent condition between deep cleans.With these steps complete, your paving slabs should look clean, refreshed and ready to enjoy once more.Recommended for ongoing care - explore our full range of Outdoor Cleaners for powerful, reliable performance across every surface in your garden. How to Keep Paving Slabs Cleaner for Longer Once your paving slabs are clean and restored, a few simple maintenance habits will help you keep them that way for longer. Regular attention prevents dirt, moss and algae from returning - saving you time and effort in the future while preserving the beauty and safety of your outdoor spaces. 1. Sweep Regularly A quick weekly sweep can make a big difference. Removing fallen leaves, soil and debris stops organic matter from breaking down and feeding algae growth. It also prevents stains from forming, especially in shaded or damp areas. 2. Rinse After Wet Weather After heavy rain or during the wetter months, give your paving a light rinse with a garden hose. This washes away surface dirt before it settles and helps reduce the likelihood of moss or algae forming. 3. Apply a Protective Sealer For lasting protection, consider sealing your paving after cleaning. A quality sealer acts as a barrier against water, grime and frost damage, helping to keep your paving looking newer for longer.We recommend Jeyes Masonry & Driveway Sealer 5L - ideal for protecting stone, concrete and brick surfaces from the elements. 4. Schedule Seasonal Deep Cleans Even with regular upkeep, a deeper clean once or twice a year (typically in spring and autumn) will keep your outdoor areas fresh and hygienic. Using trusted outdoor cleaning solutions from Jeyes Fluid ensures long-lasting results and helps prevent stubborn build-up from taking hold.For additional products designed to protect and maintain your paving, visit our Surface Protection & Grout Cleaning Collection - the professional choice for homeowners who take pride in their outdoor spaces. Common Mistakes to Avoid! Cleaning your paving slabs might seem straightforward, but small missteps can lead to damage or less effective results. Avoiding these common mistakes will help you protect your surfaces and get the most from your outdoor cleaning routine. 1. Using Bleach or Harsh Chemicals Household bleach and acidic cleaners can discolour or weaken paving materials, especially natural stone. They can also harm plants and surrounding soil. Instead, always use purpose-made outdoor cleaning products like Jeyes Fluid Original Outdoor Disinfectant 5L - formulated to clean powerfully yet safely across patios, paths and driveways. 2. Failing to Rinse Thoroughly Leaving cleaner or debris on the surface after scrubbing can lead to streaking or residue once dry. Always rinse thoroughly with clean water to ensure a smooth, even finish and a safe, slip-free surface. 3. Using the Wrong Tools Metal brushes or wire scrapers can scratch and damage paving surfaces, making them more prone to moss and dirt build-up later. Opt for a stiff-bristled outdoor brush instead - strong enough to clean effectively without harming the stone. 4. Skipping Protective Gear Outdoor cleaners are designed for powerful performance, so always wear gloves and avoid contact with eyes and skin. Taking these small precautions keeps the cleaning process safe and straightforward. 5. Ignoring Manufacturer Instructions Each cleaner is formulated differently, so following the dilution ratios and contact times on the label ensures both safety and effectiveness. Jeyes Fluid products are developed to work efficiently when used exactly as directed - giving you professional results with peace of mind.By avoiding these pitfalls, you’ll keep your paving looking its best while protecting your investment for years to come. Why Choose Jeyes Fluid for Outdoor Cleaning? For over 145 years, Jeyes Fluid has been the name homeowners trust to keep their outdoor spaces clean, hygienic and well cared for. Since 1877, our products have helped generations tackle the toughest outdoor cleaning challenges - from mossy patios and algae-covered decking to weathered driveways and dirty paths.Our range is built on a legacy of proven performance and reliability. Each Jeyes Fluid product is formulated to deliver outstanding cleaning power while maintaining the highest standards of safety for your family, pets and garden. You’re Ready to Clean! Learning how to clean paving slabs properly not only restores the appearance of your outdoor spaces but also protects them for the long term. By following the right steps - and using trusted cleaning solutions from Jeyes Fluid - you can achieve safe, professional-grade results that last season after season.Browse the complete Jeyes Fluid Outdoor Cleaning Range to find everything you need to keep your paving - and every other outdoor surface - looking beautifully clean all year round. Frequently Asked Questions Can I use bleach to clean paving slabs? It’s best to avoid bleach. While it might remove surface dirt, bleach can discolour stone and concrete over time, damage nearby plants and harm surrounding soil.Instead, use a dedicated outdoor cleaning solution such as Jeyes Fluid Original Outdoor Disinfectant 5L - formulated to clean effectively, disinfect safely and protect your outdoor surfaces without harsh side effects. Is Jeyes Fluid safe for all types of paving? Yes - when diluted and applied as directed, Jeyes Fluid products are suitable for most paving materials, including concrete, brick and stone. However, for natural or delicate stone, it’s always best to test on a small, inconspicuous area first. Each formula is designed to deliver powerful cleaning performance while maintaining the integrity of the surface. How often should I clean my paving slabs? For best results, aim to give your paving a thorough clean at least twice a year. This keeps algae, moss and dirt under control and prevents long-term discolouration. In between deep cleans, a light sweep or rinse will help maintain a fresh, tidy appearance. Can I pressure wash after using Jeyes Fluid? Absolutely. Once the cleaning solution has been left to work and thoroughly rinsed off, a pressure washer can be used to enhance results and remove any remaining residue. Combining both methods gives your paving slabs a professional-quality finish that lasts.
Read More
How to Clean a Driveway (Expert Guide)
Your driveway is one of the first things people notice about your home - yet it’s also one of the most exposed. Over time, oil spills, algae, moss and everyday dirt can make even the smartest surface look tired and slippery underfoot. Regular cleaning not only restores its appearance but also protects against long-term wear and damage. With more than 145 years of outdoor cleaning expertise, Jeyes Fluid has been trusted by generations to deliver powerful, reliable results across a plethora of gardens and driveways. In this expert guide, we’ll show you how to clean your driveway safely and effectively, using proven methods and professional-grade outdoor cleaners designed for lasting performance. Why Cleaning Your Driveway is Crucial A clean driveway does more than improve your home’s kerb appeal - it plays a vital role in safety and surface preservation. Dirt, algae and moss can quickly build up, especially in the damp climate we inevitably experience, creating slippery patches that increase the risk of slips and falls. In colder months, trapped moisture can freeze and expand, causing cracks or surface erosion over time. Consistent driveway cleaning helps prevent this gradual damage, extending the life of materials such as concrete, block paving and tarmac. Beyond safety and durability, maintaining a clean driveway also protects your investment. By removing organic growth and contaminants early, you reduce the need for costly repairs or resurfacing later. What You’ll Need Before You Start Before beginning any driveway cleaning process, preparation is key. Having the right tools and cleaning products to hand will make the process smoother. Essential tools and equipment: A stiff outdoor broom or brush for sweeping debris A bucket or watering can for applying cleaning solution A pressure washer (optional, depending on the surface type) A hose with clean water supply for rinsing Protective gloves and suitable footwear for safety Choosing the right cleaner for your driveway Not all driveways are the same - and neither are the cleaning solutions they require. For concrete or block paving, a specialist formula such as the Jeyes Driveway & Masonry Cleaner 5L effectively lifts dirt, grease and algae without harming the surface. For more delicate materials like tarmac or resin-bound driveways, a gentler product such as the Jeyes Multi-Use Outdoor Cleaner 5L is ideal. If you’re unsure which cleaner best suits your surface, use our Product Selector for bespoke recommendations; you can also find helpful application advice on our FAQs page to ensure the best results every time. Safety first: Always wear gloves when handling cleaning solutions and avoid contact with skin or eyes. Ensure good ventilation when working outdoors and take care to prevent run-off into garden borders or drains not intended for chemical products. Jeyes Fluid products are formulated for outdoor use and, when used as directed, provide a powerful yet responsible way to keep your home environment clean and hygienic. How to Clean a Driveway (Step-By-Step) No matter the material, a structured approach delivers the best results. Follow our steps below to restore your driveway’s appearance and maintain its long-term condition. For Concrete and Masonry Driveways Clear the surface: Start by sweeping away loose dirt, leaves and debris using a stiff brush. Pre-rinse: Hose down the area to remove surface dust and prepare it for cleaning. Apply your cleaner: Dilute Jeyes Driveway & Masonry Cleaner 5L according to the on-pack instructions. Pour or spray evenly across the surface, ensuring full coverage. Agitate and leave to work: Use a stiff brush to scrub the area, then allow the solution to sit for around 10–15 minutes to break down ingrained grime and algae. Rinse thoroughly: Rinse away the cleaner with clean water, either with a hose or a pressure washer set to a moderate pressure. For Block Paving Remove moss and weeds: Pull up weeds between the joints and sweep off debris. Apply cleaner: Use Jeyes 4-in-1 Patio & Decking Cleaner 4L diluted as directed. Pour or spray evenly across the blocks. Scrub and rinse: Work the cleaner into the surface with a stiff brush, leave for 5–10 minutes, then rinse well. Re-sand if needed: Once the area is dry, brush kiln-dried sand into the joints to maintain stability and prevent weed regrowth. For Tarmac or Asphalt Driveways Avoid harsh pressure: Tarmac can be softened or damaged by high-pressure washing. Use a garden hose and stiff brush instead. Use the right product: Apply Jeyes Multi-Use Outdoor Cleaner 5L, which cleans effectively without stripping or fading the surface. Work gently: Scrub with a soft or medium-bristled brush, leave for a short contact period and rinse thoroughly. For Resin-Bound Driveways Gentle approach only: Resin-bound surfaces are durable but can be damaged by abrasive scrubbing or strong chemicals. Apply mild solution: Use a diluted mix of Jeyes Original Classic Outdoor Disinfectant 5L to sanitise and remove light organic build-up. Rinse thoroughly: Rinse with a hose or a low-pressure washer. Routine maintenance: Clean quarterly to prevent moss and algae taking hold, particularly in shaded or damp areas. Expert Tip: Always test any cleaning product on a small, inconspicuous area first to ensure compatibility with your surface. Avoid using bleach or unapproved detergents, as they can discolour or weaken materials. Removing Common Driveway Stains Even with regular maintenance, driveways can develop stubborn stains that require targeted cleaning: Oil and Grease Stains Oil and grease are among the most common driveway problems, especially beneath parked vehicles. If left untreated, they can penetrate porous materials like concrete or block paving. How to treat: Blot up any fresh spills using absorbent material such as cat litter or paper towels. Apply Jeyes Driveway & Masonry Cleaner 5L directly to the affected area. Scrub with a stiff brush and allow it to sit for 10–15 minutes to break down the residue. Rinse thoroughly with clean water. For stubborn stains, a second application may be required. This formula is designed to lift oil and petrol residues safely without damaging the surrounding driveway surface. Algae, Moss and Lichen Green and black growths such as algae and lichen thrive in damp, shaded areas - particularly during autumn and winter. Besides looking unsightly, they can make surfaces dangerously slippery. How to treat: Remove any loose moss using a broom or scraper. Apply Jeyes Original Classic Outdoor Disinfectant 5L over the affected area. Allow to soak for around 15 minutes; this kills spores and helps prevent regrowth. Rinse away thoroughly with clean water. Regular treatment helps maintain a hygienic surface while preventing the return of moss and algae, keeping your driveway safer all year round. Rust or Tyre Marks Rust stains often appear where metal garden items or tools have been left outdoors, while tyre marks can form from repeated vehicle movement on warm surfaces. How to treat: Apply a small amount of Jeyes Multi-Use Outdoor Cleaner 5L to the stain. Agitate with a brush and allow contact for several minutes. Rinse thoroughly and repeat if necessary. Persistent tyre marks may require regular light cleaning to prevent reappearance. By addressing stains promptly using the correct product, you’ll maintain both the cleanliness and integrity of your driveway surface - ensuring it looks fresh in every season. Driveway Maintenance Tips Once your driveway is clean, a few simple habits can make all the difference in keeping it that way. Routine maintenance not only saves time and effort later but also helps to protect the structure of your surface against weathering, moss growth and discolouration. 1. Clean seasonally Aim to give your driveway a thorough clean twice a year - ideally in spring and autumn - when temperatures are mild and surfaces dry quickly. This helps prevent dirt and organic matter from becoming embedded. A light refresh using the Jeyes Multi-Use Outdoor Cleaner between deep cleans will also keep surfaces looking their best. 2. Keep drains clear Standing water encourages moss and algae to return. Ensure surrounding drains and gutters remain clear to allow proper water flow, especially after heavy rainfall. 3. Tackle small stains immediately Prompt action prevents stains from setting. Oil spots, tyre marks, or muddy patches can usually be treated quickly with Jeyes Driveway & Masonry Cleaner, preventing the need for intensive cleaning later. 4. Control weeds and moss growth Sweep your driveway regularly to remove loose soil and debris that encourage weeds. A quick application of Jeyes Original Classic Outdoor Disinfectant every few months helps discourage regrowth and keeps surfaces hygienically clean. 5. Consider protective sealing Applying a weatherproof sealer such as the Jeyes Masonry & Driveway Sealer 5L provides a protective barrier against moisture, staining and frost damage - making future cleans faster and more effective. With these simple routines, your driveway will remain clean, safe and well-maintained throughout the year. Explore the full range of professional cleaning solutions in the Outdoor Cleaner Collection to find everything you need for lasting results. Expert Tip: Protect Your Driveway After Cleaning Once your driveway has been thoroughly cleaned, the best way to maintain its condition is through proper protection. Clean, porous surfaces - particularly concrete and block paving - are more susceptible to staining and moss regrowth if left untreated. Sealing the surface after cleaning not only enhances its appearance but also forms a protective barrier against the elements. For long-lasting defence, apply Jeyes Masonry & Driveway Sealer 5L once the surface is completely dry. This professional-grade sealer penetrates deep into the material, helping to: Repel water and resist frost damage Prevent moss, algae and lichen from taking hold Reduce the likelihood of oil and dirt absorption Make future cleans quicker and easier To apply, use a watering can or sprayer to ensure even coverage and allow the surface to dry thoroughly before walking or driving on it. With correct sealing, you can expect cleaner results that last for many months - even through the challenges of the British weather. By combining regular cleaning with effective surface protection, you’ll preserve both the appearance and durability of your driveway, keeping it looking like new for years to come. Our formulations are carefully developed to tackle even the toughest outdoor cleaning challenges while being safe, effective and easy to use. Explore our full Outdoor Cleaning Range to find the perfect solution for your next cleaning task.
Read More